- Published on
[AWS] - Deploy Spring Boot application to AWS EC2 instance
- Authors

- David Nguyen
Table of Contents
- 1. What are we going to do?
- 2. Create a Spring Boot project
- 2.1 - Packaging application as a .jar file using Maven.
- 2.2 - Packaging application as Docker image and push to DockerHub.
- 3. Deploy Spring Boot application to AWS EC2
- 3.1 - configure and create an AWS EC2 instance.
- 3.2 - Deploy and run as a service using .jar file.
- 3.2 - Deploy and run as a Docker container.
- 4. Summary.
1. What are we going to do?
In this post, we'll build a simple Spring Boot application and then explore how to deploy it to an AWS EC2 instance using both a
.jarfile and a Docker container..First, we'll create a simple Spring Boot application that acts as a back-end service, exposing an API that returns a list of user information in JSON format.
After that, we'll package the application into a
.jarfile and create a Docker image based on a Dockerfile, both of which we'll use to deploy the application to an AWS EC2 instance.Finally, we'll create and configure an AWS EC2 instance (using the free tier), and then deploy our application to it using either the
.jarfile or the Docker image we created earlier.
=> The flow for deploying and running our application as service on server:
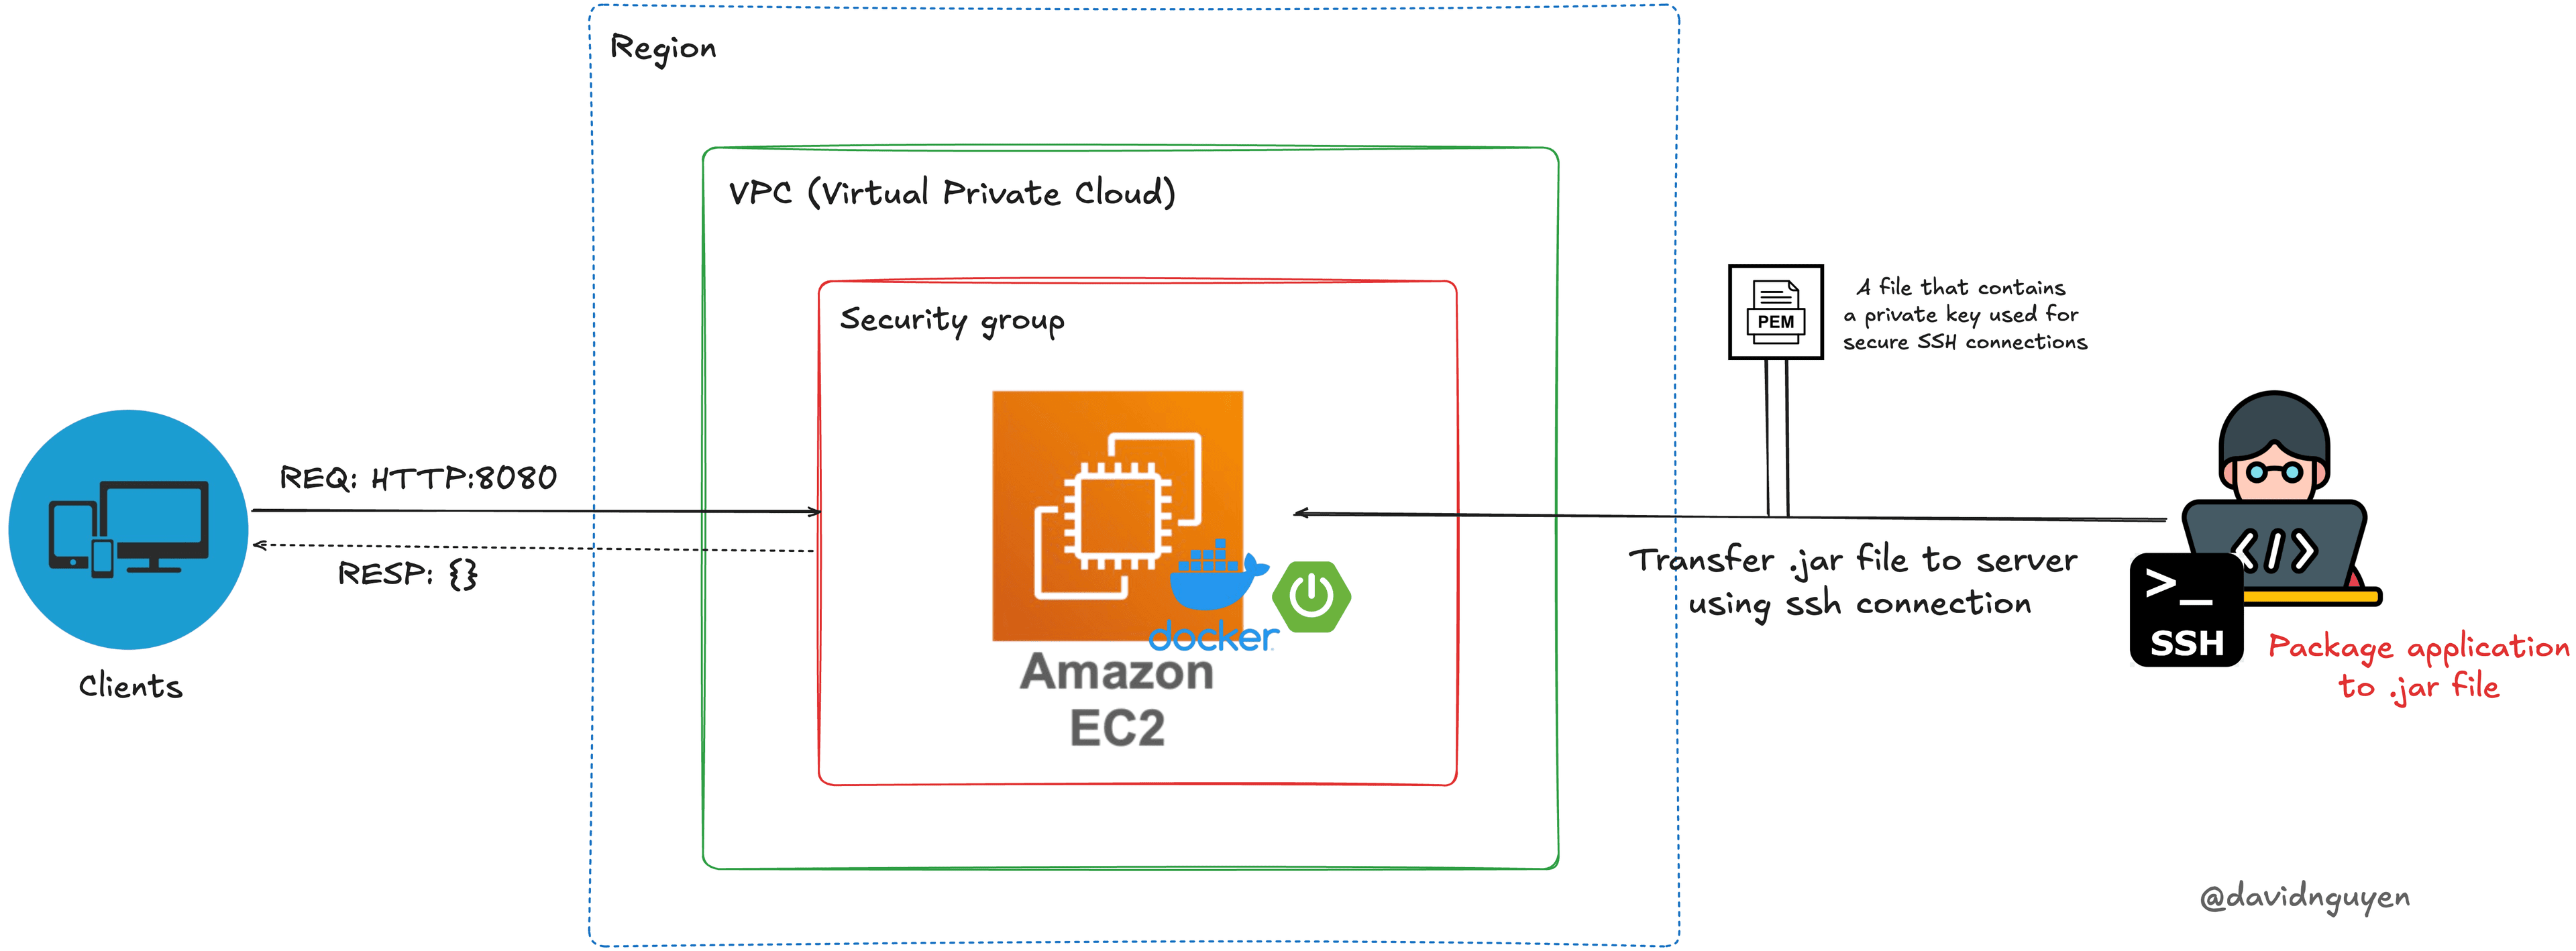
=> The flow for deploying and running our application as Docker container:

2. Create a Spring Boot project
To keep the focus on the main topic of deploying a Spring Boot application to an AWS EC2 instance, you can quickly create a simple Spring Boot application using Spring Initializr
Our application will expose an API at the endpoint
/api/v1/users/that returns a list of users as a JSON object.Find more details about the source code on my GitHub.
2.1 - Packaging application as a .jar file using Maven.
- To package a Spring Boot application into a
.jarfile, first navigate to the project's root directory. Then, you can use Maven by executing the following command (make sure Maven is installed and correctly configured on your machine beforehand):
mvn clean package
- If you are using Gradle as your build tool, you can package the Spring Boot application using the following command:
./gradlew build
- After the application is built, a folder named
./targetwill be created, and you can find the resulting.jarfile inside it.
2.2 - Packaging application as Docker image and push to DockerHub.
- First, we need to define a Dockerfile with the following steps:
FROM openjdk:17-jdk

WORKDIR /app

COPY target/cicd-demo-*.jar /app/cicd-demo.jar

EXPOSE 8080

CMD ["java", "-jar", "cicd-demo.jar"]
- Run the following command in the directory where the Dockerfile is located to build a Docker image based on that Dockerfile:
docker build -t <your docker hub username>/<your image name>:<version> .
=> For example:
docker build -t canhnd15/cicd-demo:latest .
- Push the created Docker image to DockerHub by running the following command (Note: Make sure you're logged into DockerHub first):
docker push <your docker hub username>/<your image name>:<version>
=> For example:
docker push canhnd15/cicd-demo:latest
3. Deploy Spring Boot application to AWS EC2
3.1 - configure and create an AWS EC2 instance.
To deploy any application to an AWS service, you must have an AWS account. If you don't have one, follow this AWS account creation guide to create your account.
Now, we need to create and configure an AWS EC2 instance to host our application. However, one of the best practices when working with AWS services is to avoid using the root account for everyday tasks.
=> Therefore, in this article, I'll create a sub-account (IAM user) and perform all actions using that account. However, you can also work on your root account if you prefer — there's no problem with that.
Step 1: Login to your AWS account
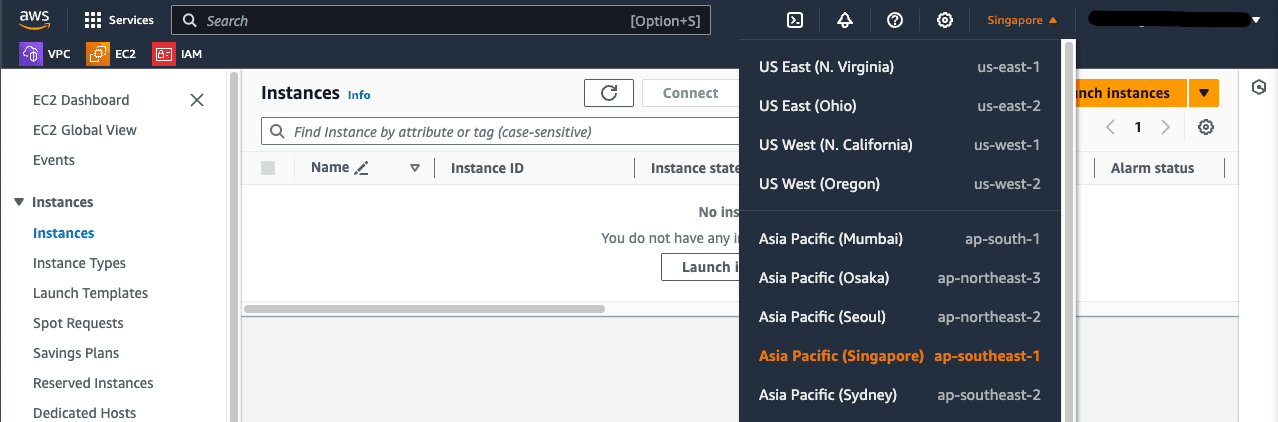
Step 2: Choose a region close to your location, as this will help make your requests and responses faster.
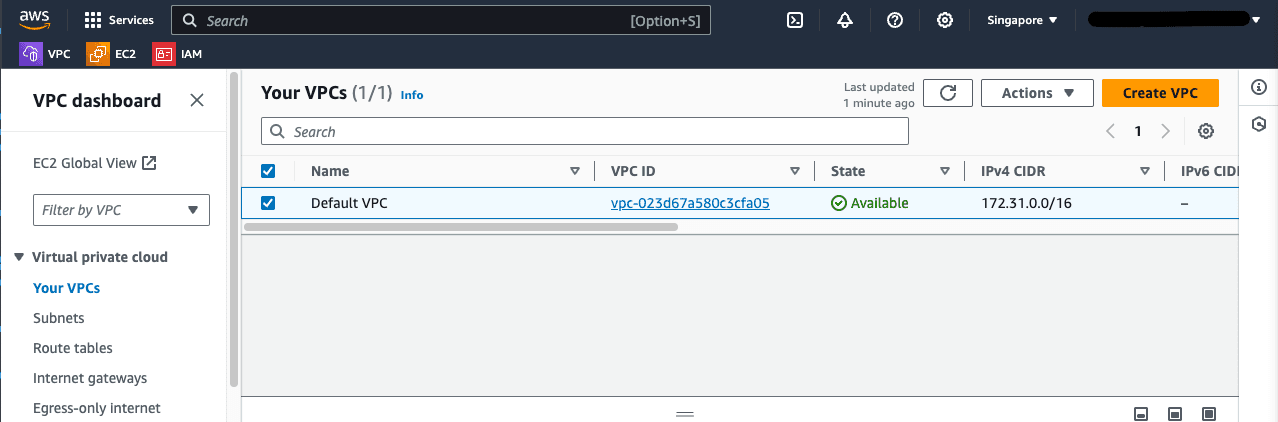
- We have a default VPC (Virtual Private Cloud) available, so there is no need to create a new one.
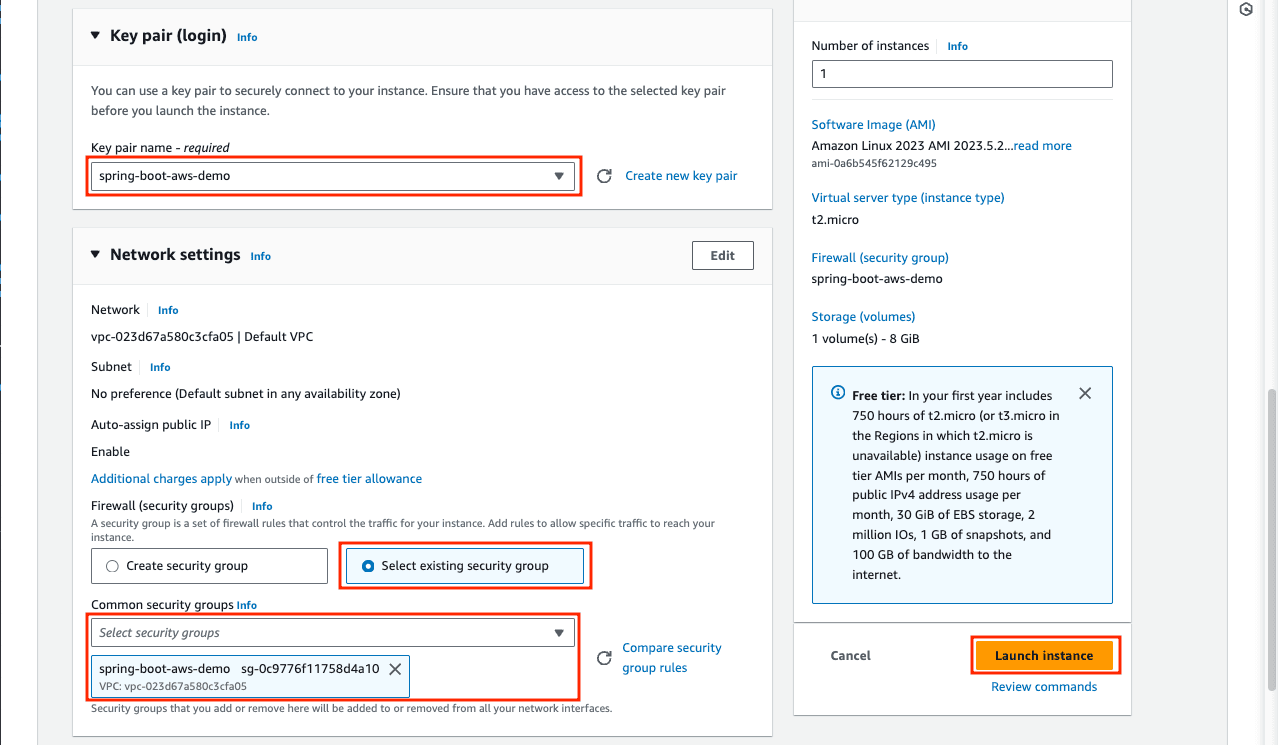
Step 3: Create a Security Group
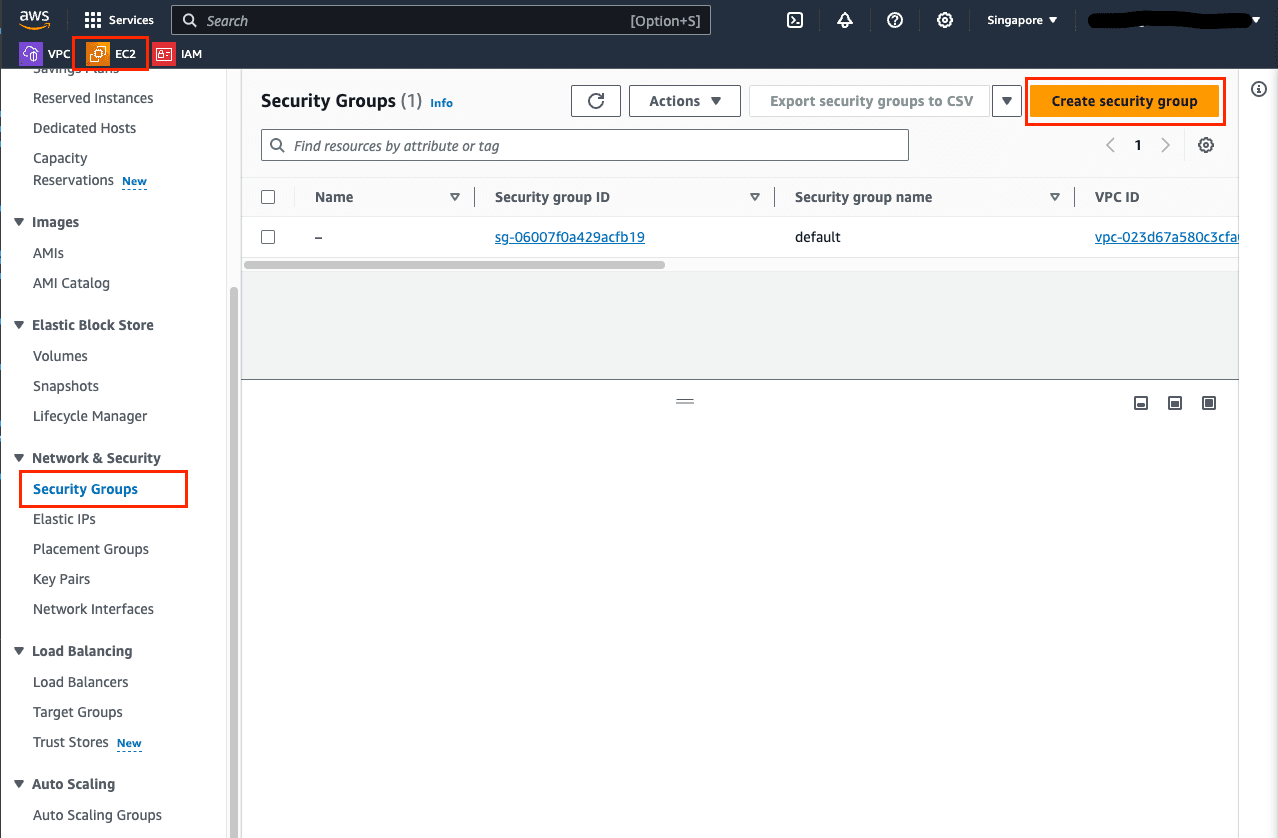
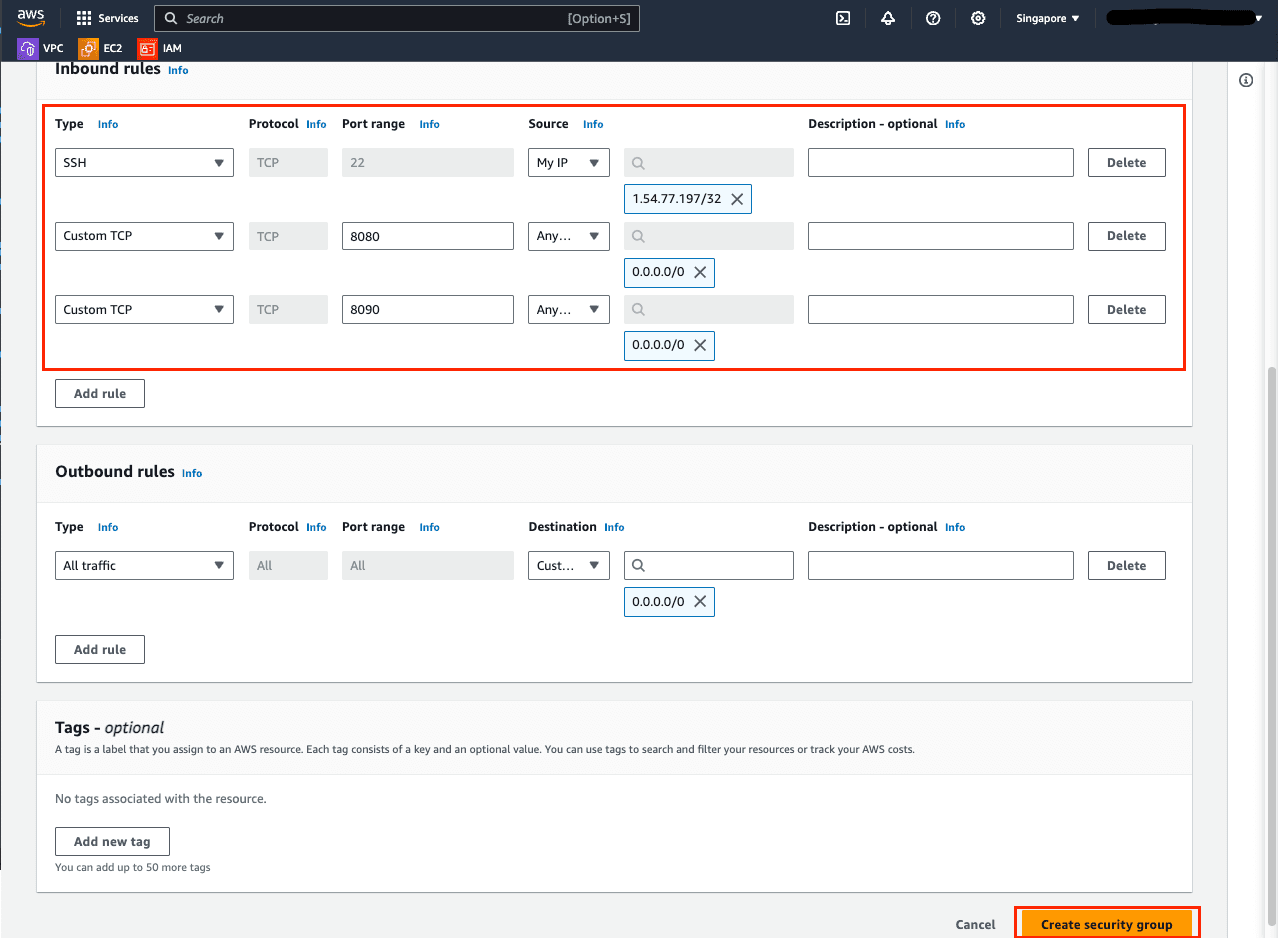
- Create new rules:
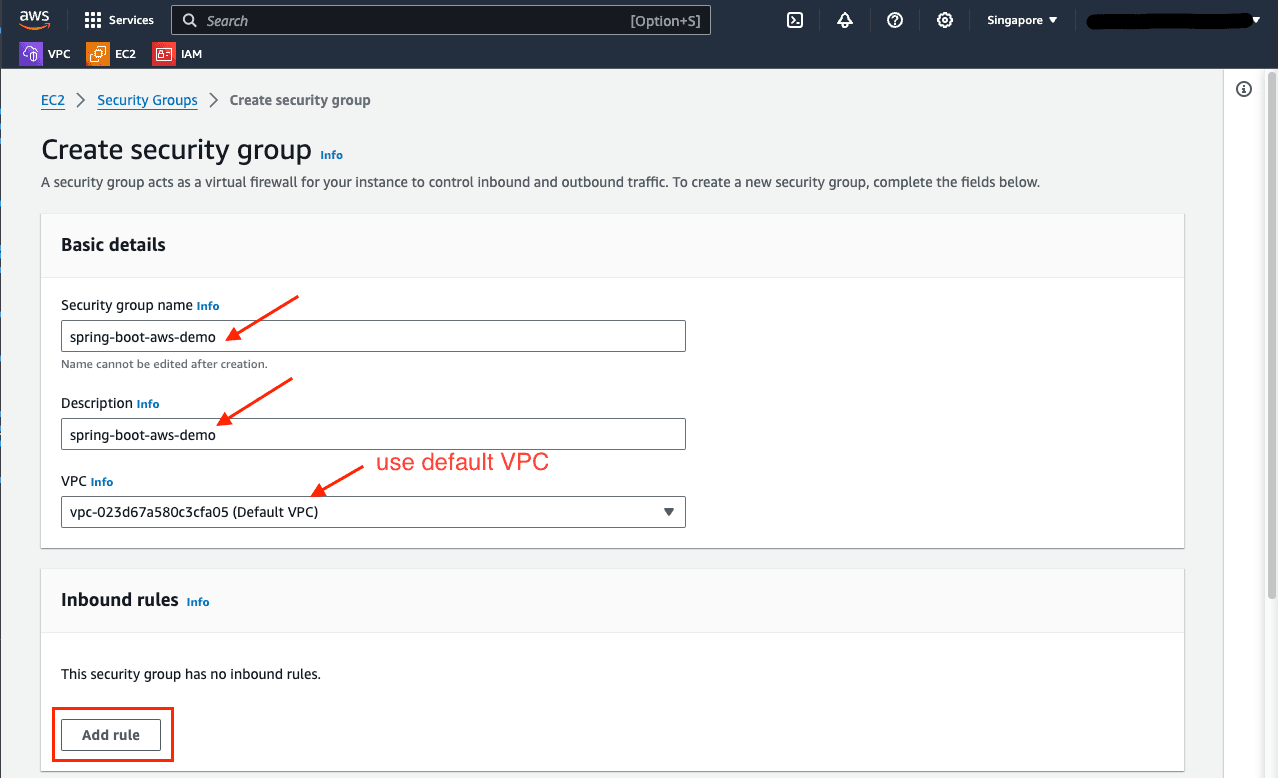
Here, we configure the inbound rules for accessing the EC2 instance from outside:
- SSH (port 22): Allow access only from your machine's IP address.
- HTTP (port 8080): Allow access from any IPv4 address.
- HTTP (port 8090): Allow access from any IPv4 address.
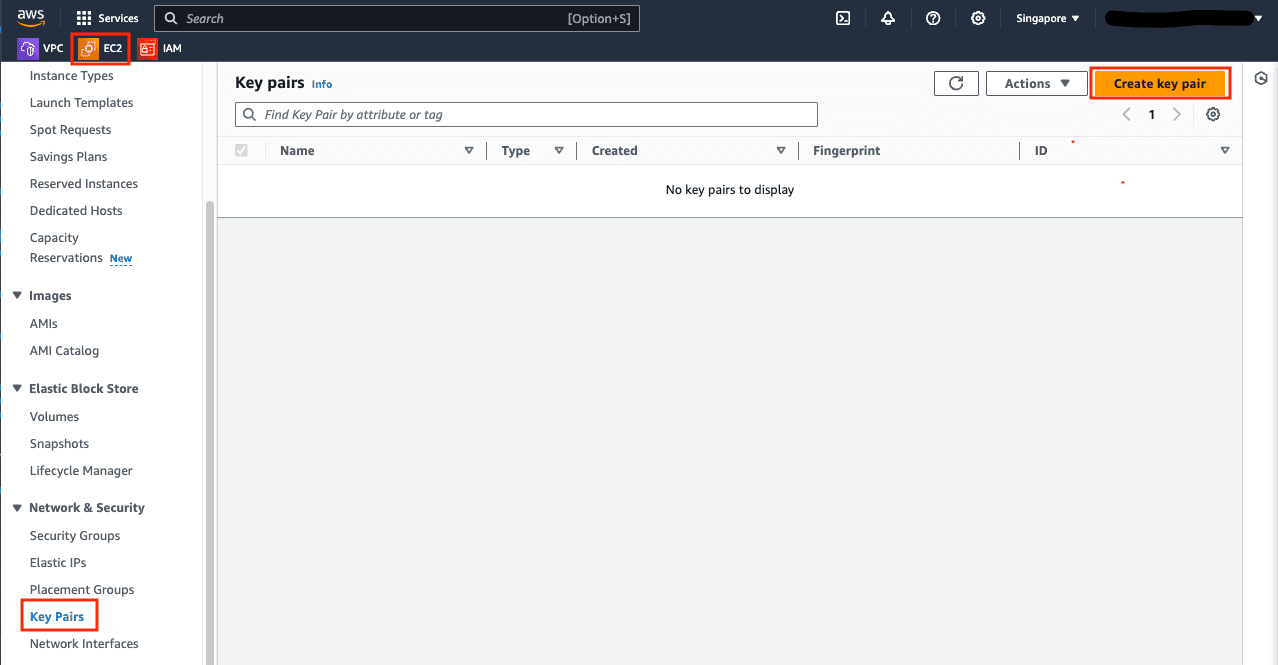
Step 4: Create a new Key Pairs
- Next, we need to create a new key pair file to secure access to our EC2 instance. Be sure to save the created file in a safe directory.
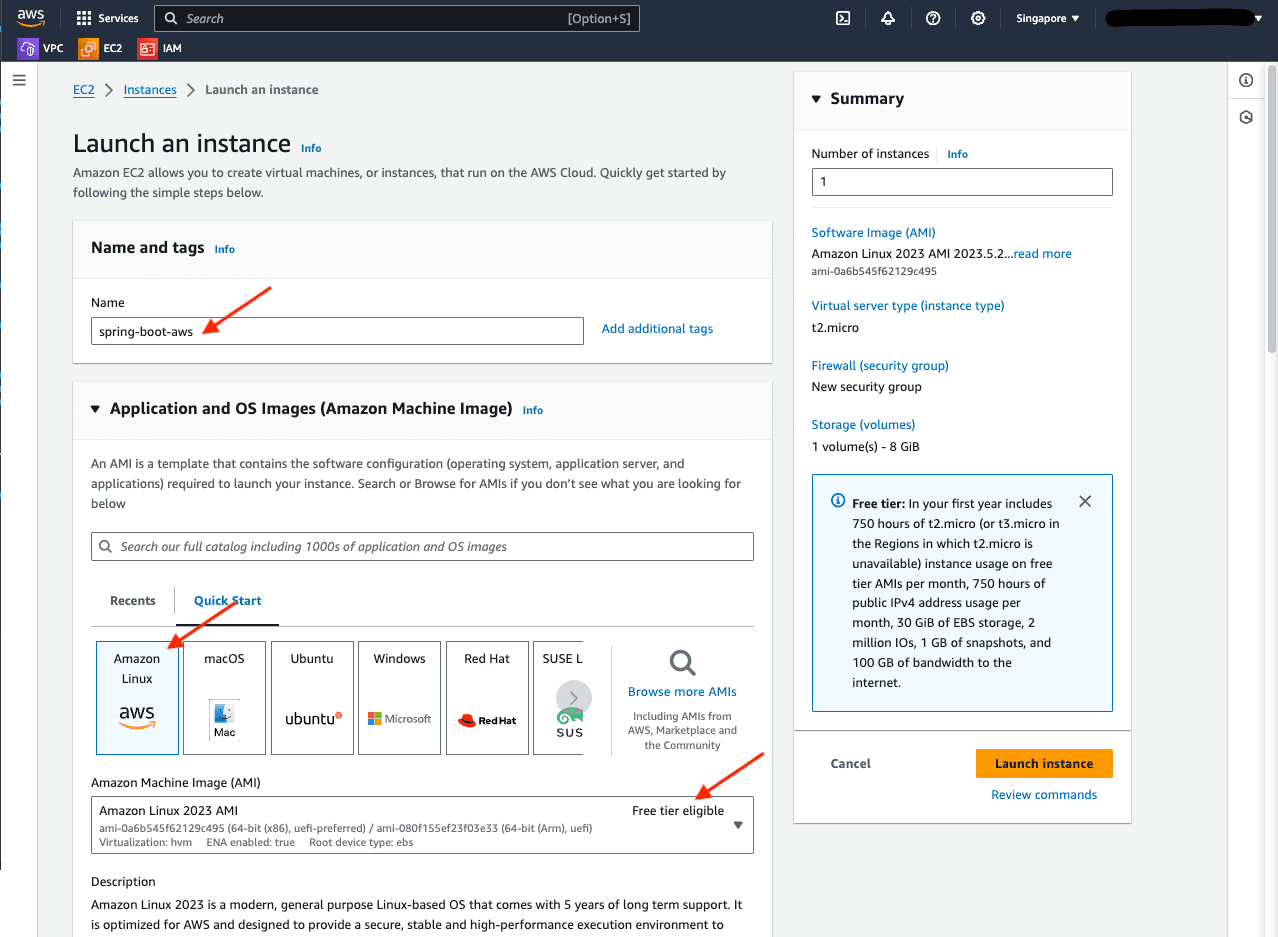
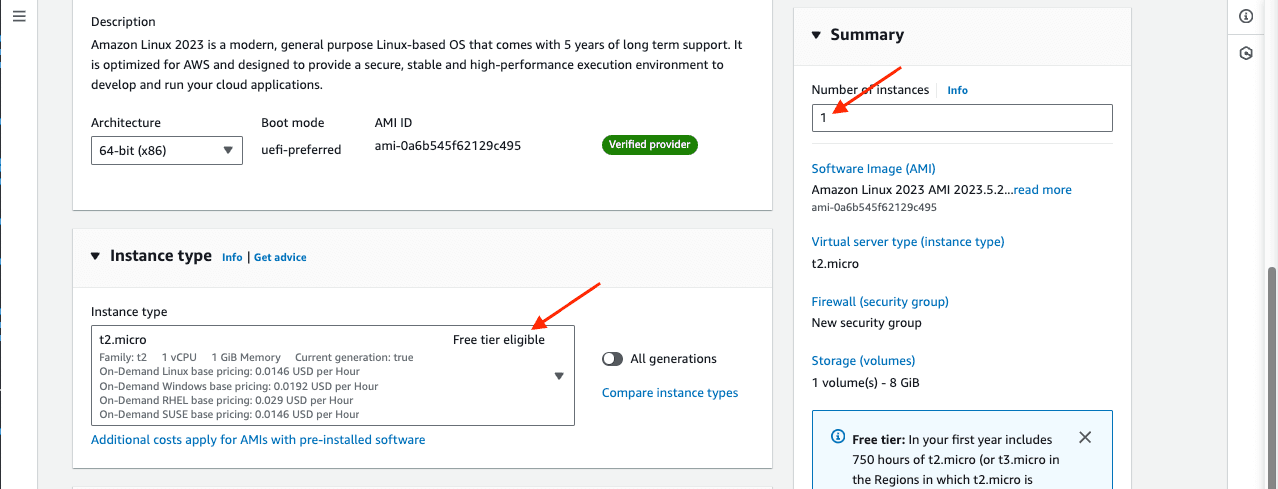
Step 5: Launch a new instance
=> NOTE: In this post, we are using the free tier of AWS services. Make sure not to change any options that could incur charges, as I am not responsible for any costs that may arise.
- The new EC2 instance has been created. Now, let's connect to it and deploy our application.
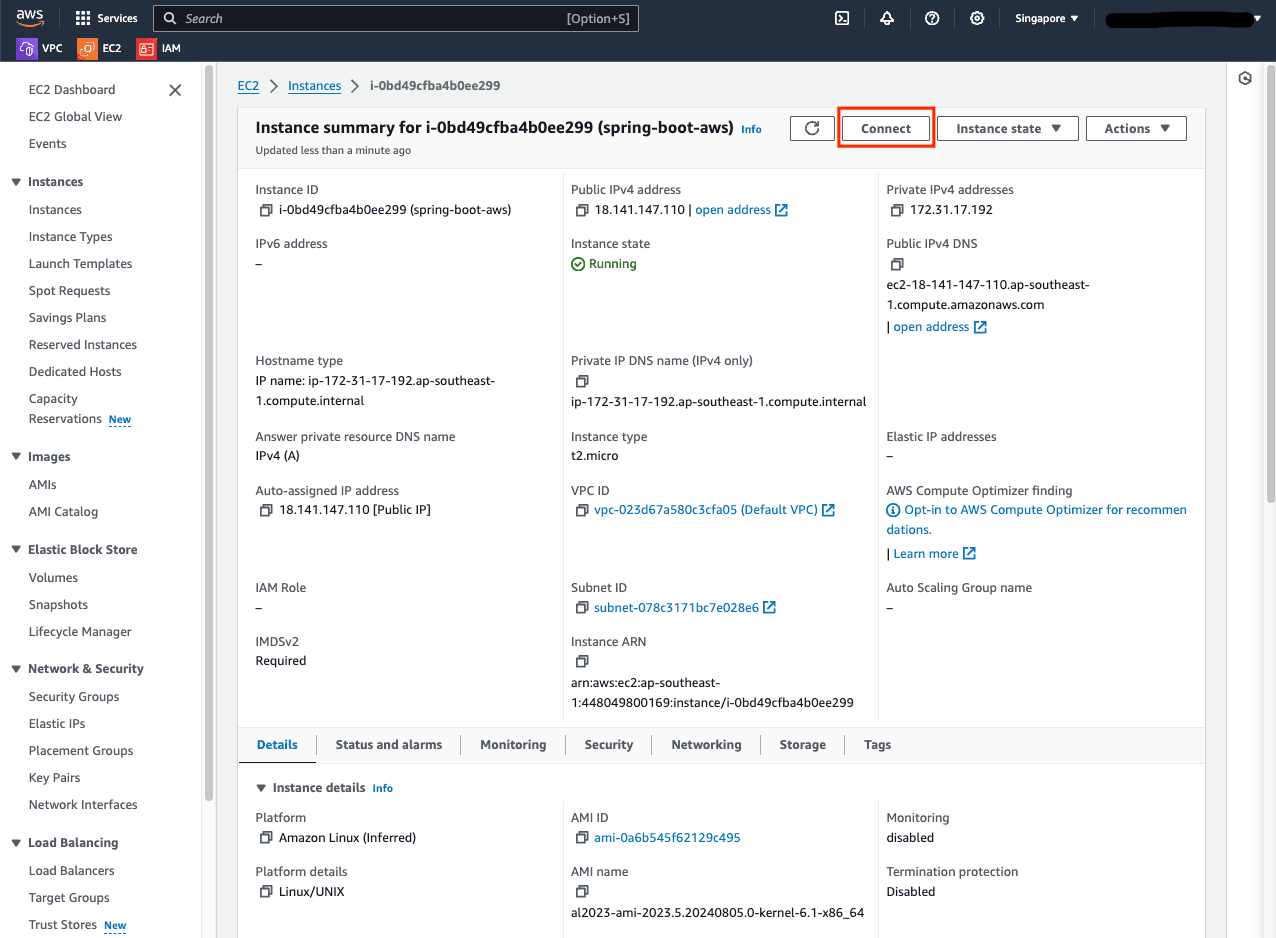
- Use can follow the instruction below to connect to our EC2 instance.
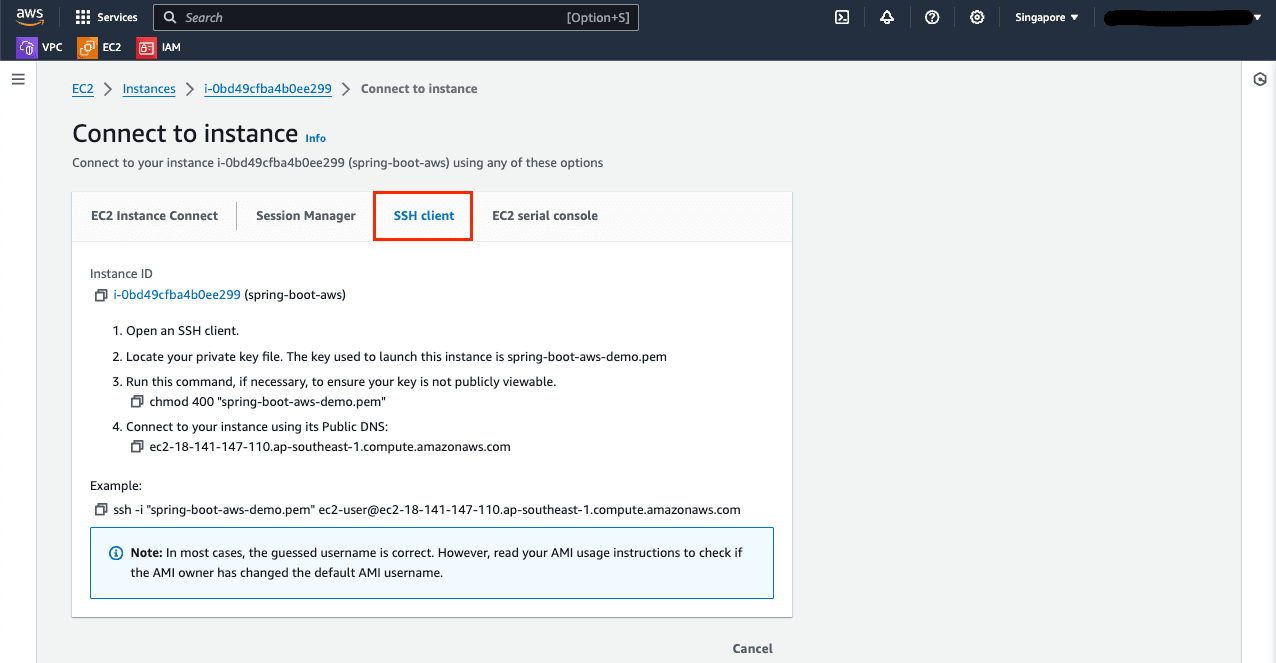
=> For example:
chmod 400 spring-boot-aws-demo.pem
ssh -i spring-boot-aws-demo.pem ec2-user@18.141.147.110
3.2 - Deploy and run as a service using .jar file.
- To run our Spring Boot application as a service via a .jar file, we first need to install Java on our EC2 instance. I will install Java version 17 using the following command:
[ec2-user@ip-172-31-17-192 ~]$ sudo yum install -y java-17
- Check Java version again
[ec2-user@ip-172-31-17-192 ~]$ java -version
openjdk version "17.0.12" 2024-07-16 LTS
OpenJDK Runtime Environment Corretto-17.0.12.7.1 (build 17.0.12+7-LTS)
OpenJDK 64-Bit Server VM Corretto-17.0.12.7.1 (build 17.0.12+7-LTS, mixed mode, sharing)
Move the
.jarwhich created from Spring Boot application to the same folder where.pemfile is located.Copy the
.jarfile from your local machine to the EC2 instance using the following command:
~/Desktop/code/aws ❯ scp -i spring-boot-aws-demo.pem cicd-demo-1.0.0.jar ec2-user@18.141.147.110:/home/ec2-user
cicd-demo-1.0.0.jar                                                                       100%   21MB   3.4MB/s   00:06
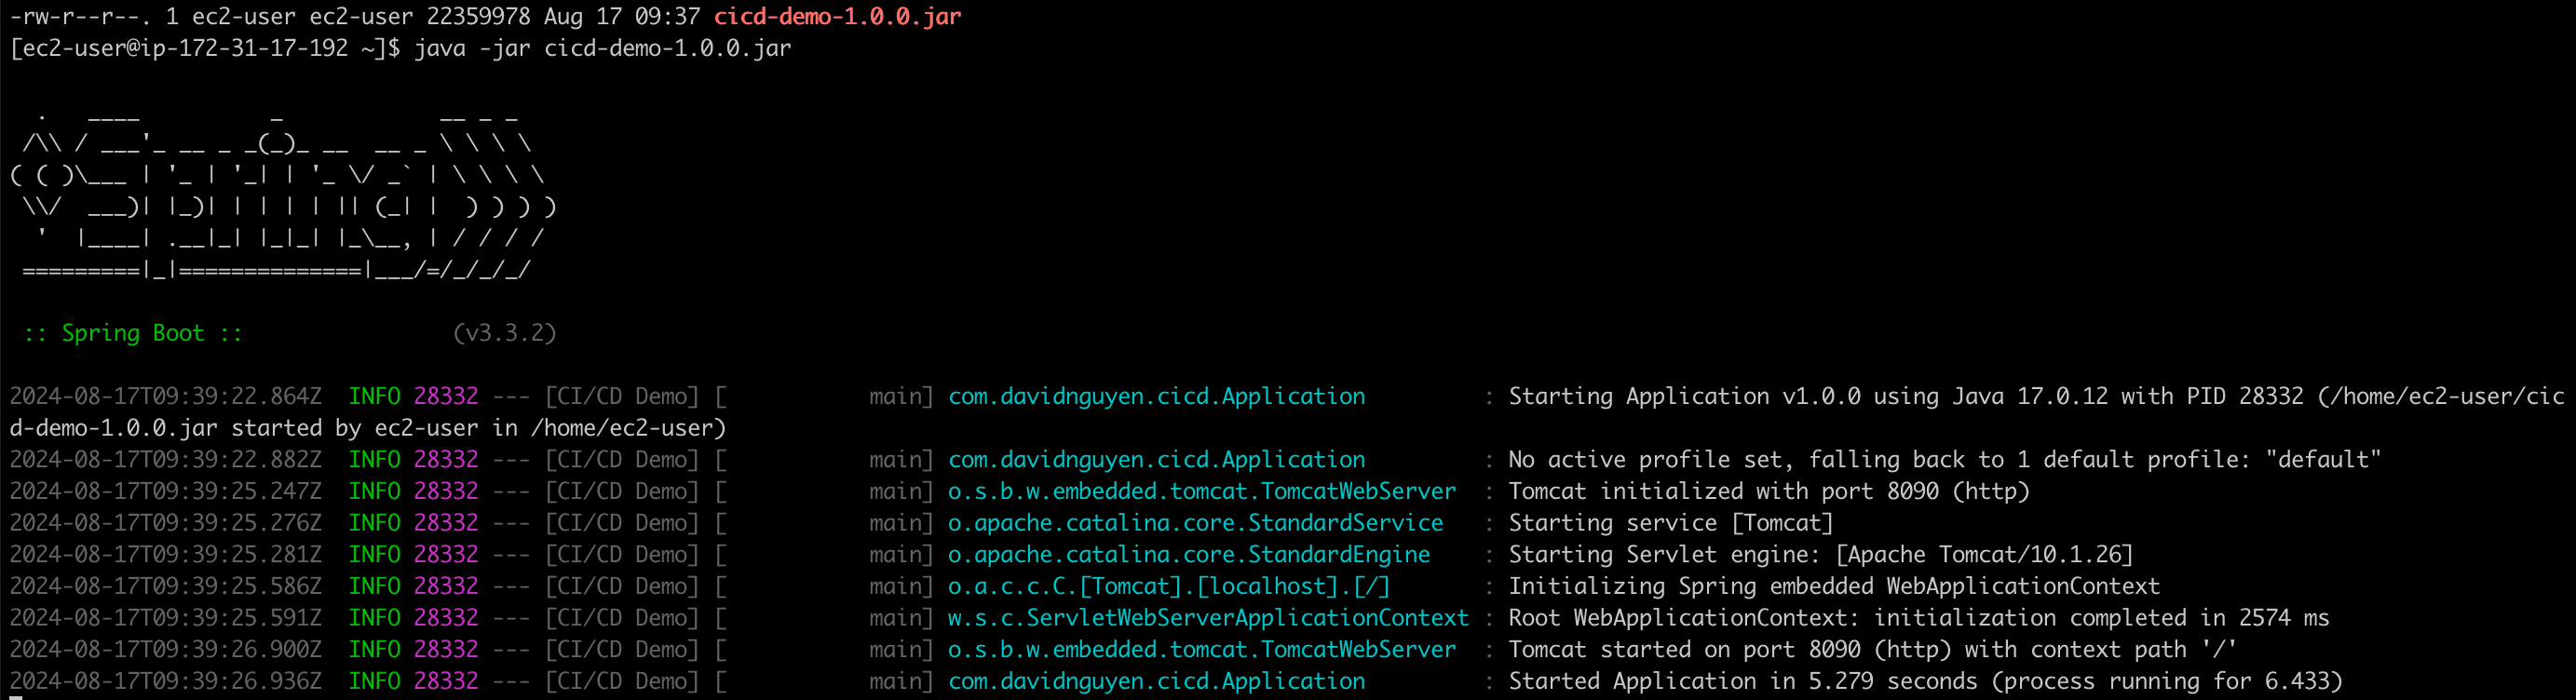
- Change directory to folder
/home/ec2-userand run the command:
java -jar cicd-demo-1.0.0.jar
- And our application is running on EC2 instance:
~/Desktop/code/aws ❯ curl http://18.141.147.110:8090/api/v1/users/
{"message":"get users successfully!","code":100,"response":[{"firstName":"firstname 0","lastName":"lastname 0","username":"username 0","email":"email_0@gmail.com"},{"firstName":"firstname 1","lastName":"lastname 1","username":"username 1","email":"email_1@gmail.com"},{"firstName":"firstname 2","lastName":"lastname 2","username":"username 2","email":"email_2@gmail.com"},{"firstName":"firstname 3","lastName":"lastname 3","username":"username 3","email":"email_3@gmail.com"},{"firstName":"firstname 4","lastName":"lastname 4","username":"username 4","email":"email_4@gmail.com"},{"firstName":"firstname 5","lastName":"lastname 5","username":"username 5","email":"email_5@gmail.com"},{"firstName":"firstname 6","lastName":"lastname 6","username":"username 6","email":"email_6@gmail.com"},{"firstName":"firstname 7","lastName":"lastname 7","username":"username 7","email":"email_7@gmail.com"},{"firstName":"firstname 8","lastName":"lastname 8","username":"username 8","email":"email_8@gmail.com"},{"firstName":"firstname 9","lastName":"lastname 9","username":"username 9","email":"email_9@gmail.com"}]}%
3.2 - Deploy and run as a Docker container.
- To run our application as a Docker container, we need to install Docker on the EC2 instance first. Use the following command:
[ec2-user@ip-172-31-17-192 ~]$ sudo yum install -y docker
- After installing Docker, start the Docker service and enable it to start on boot:
sudo systemctl start docker
sudo systemctl enable docker
- Next, run our application as a Docker container using the Docker image that was pushed to DockerHub earlier with the following command:
[ec2-user@ip-172-31-17-192 ~]$ sudo docker run --name spring-boot-aws-demo -d -p 8090:8090 canhnd15/cicd-demo:1.0.0
- And our application is running as Docker container.
[ec2-user@ip-172-31-17-192 ~]$ sudo docker ps
CONTAINER ID   IMAGE                      COMMAND                  CREATED          STATUS          PORTS                                       NAMES
1b03302077f7   canhnd15/cicd-demo:1.0.0   "java -jar cicd-demo…"   37 seconds ago   Up 35 seconds   0.0.0.0:8090->8090/tcp, :::8090->8090/tcp   spring-boot-aws-demo
4. Summary.
In this post, we explored how to use deploy a simple Spring Boot application to and AWS EC2 instance. Although this project is a simple demo, it provides a fundamental understanding for beginners and is easy to develop. I hope you find it helpful and that you learn something valuable from it!
We’ll explore more complex applications in the upcoming posts.
See you in the next posts. Happy Coding!