- Published on
Tích hợp thanh toán PayPal trong ứng dụng Spring Boot
- Authors

- David Nguyen
Table of Contents
- 1. PayPal là gì?
- 1.1 - PayPal là gì?
- 1.2 - Setup tài khoản test (sandbox)
- 2. Tổng quan ứng dụng.
- 2.1 - Flow
- 2.2 - Demo
- 3. Backend (Spring Boot)
- 3.1. - Setup và cấu hình
- 3.2 - Triển khai logic các phương thức create() và execute().
- 3.3 - Tạo Controller để public các APIs cho frontend.
- 4. Frontend (ReactJS)
- 4.1 - PaymentPage.
- 4.2 - SuccessPage.
- 4.2 - CancelPage.
- 6. Lời kết
1. PayPal là gì?
1.1 - PayPal là gì?
Để định nghĩa PayPal là gì một cách toàn diện thì sẽ rất dài vì vậy trong khuôn khổ bài viết này mình sẽ cùng các bạn chỉ đơn giản đứng dưới góc độ của một nhà phát triển muốn tích hợp PayPal vào hệ thống để hỗ trợ các thanh toán online.
Các bạn có thể tìm hiểu thêm về các dịch vụ PayPal hỗ trợ tại đây
1.2 - Setup tài khoản test (sandbox)
Để tích hợp PayPal thì phải có tài khoản PayPal, các bạn chuẩn bị một một email hợp lệ rồi đăng ký trên trang chủ của PayPal.
Sau khi có tài khoản các bạn hãy đăng nhập vào vào https://developer.paypal.com/home/.
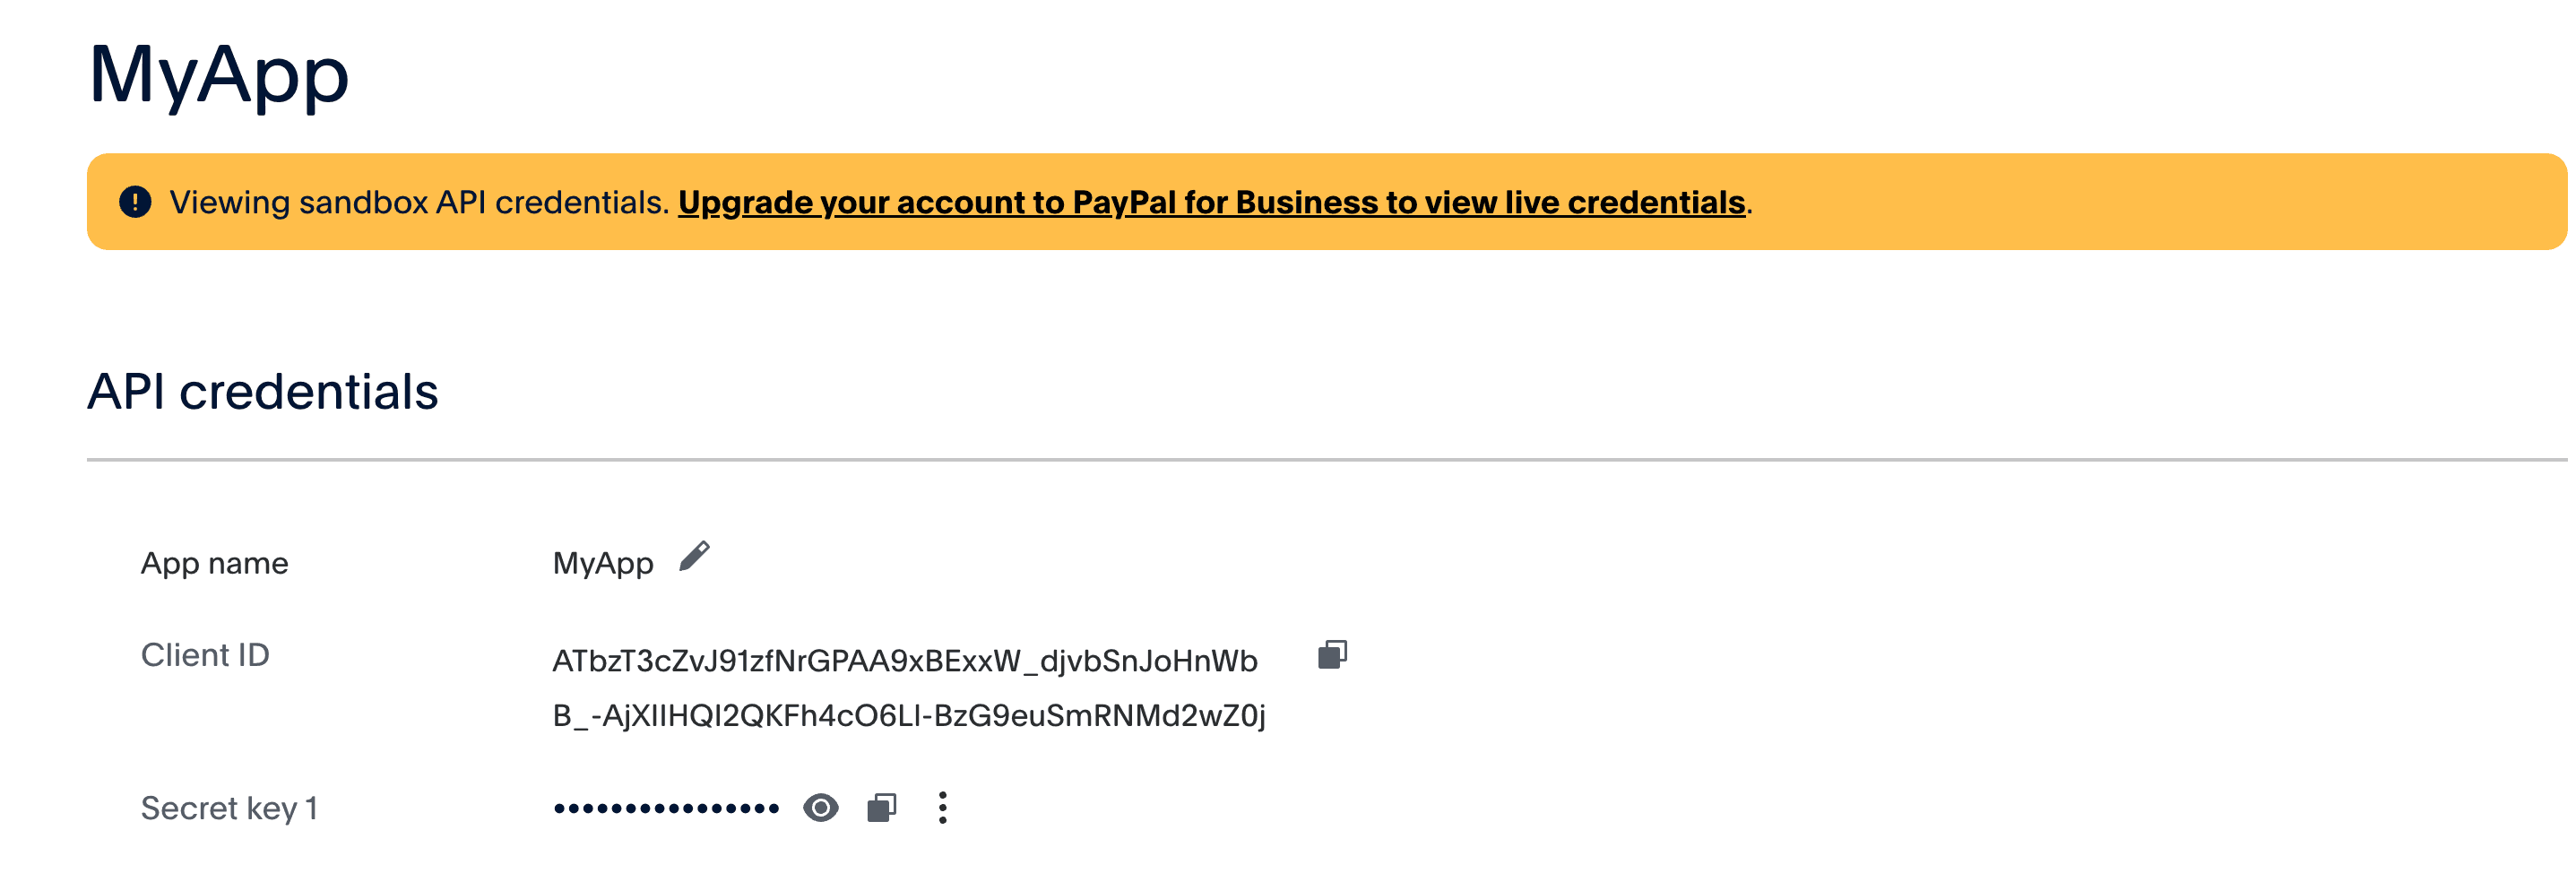
Step 1: Ở mục Apps & Credentials các bạn tạo mới một ứng dụng bằng cách bấm Create App.
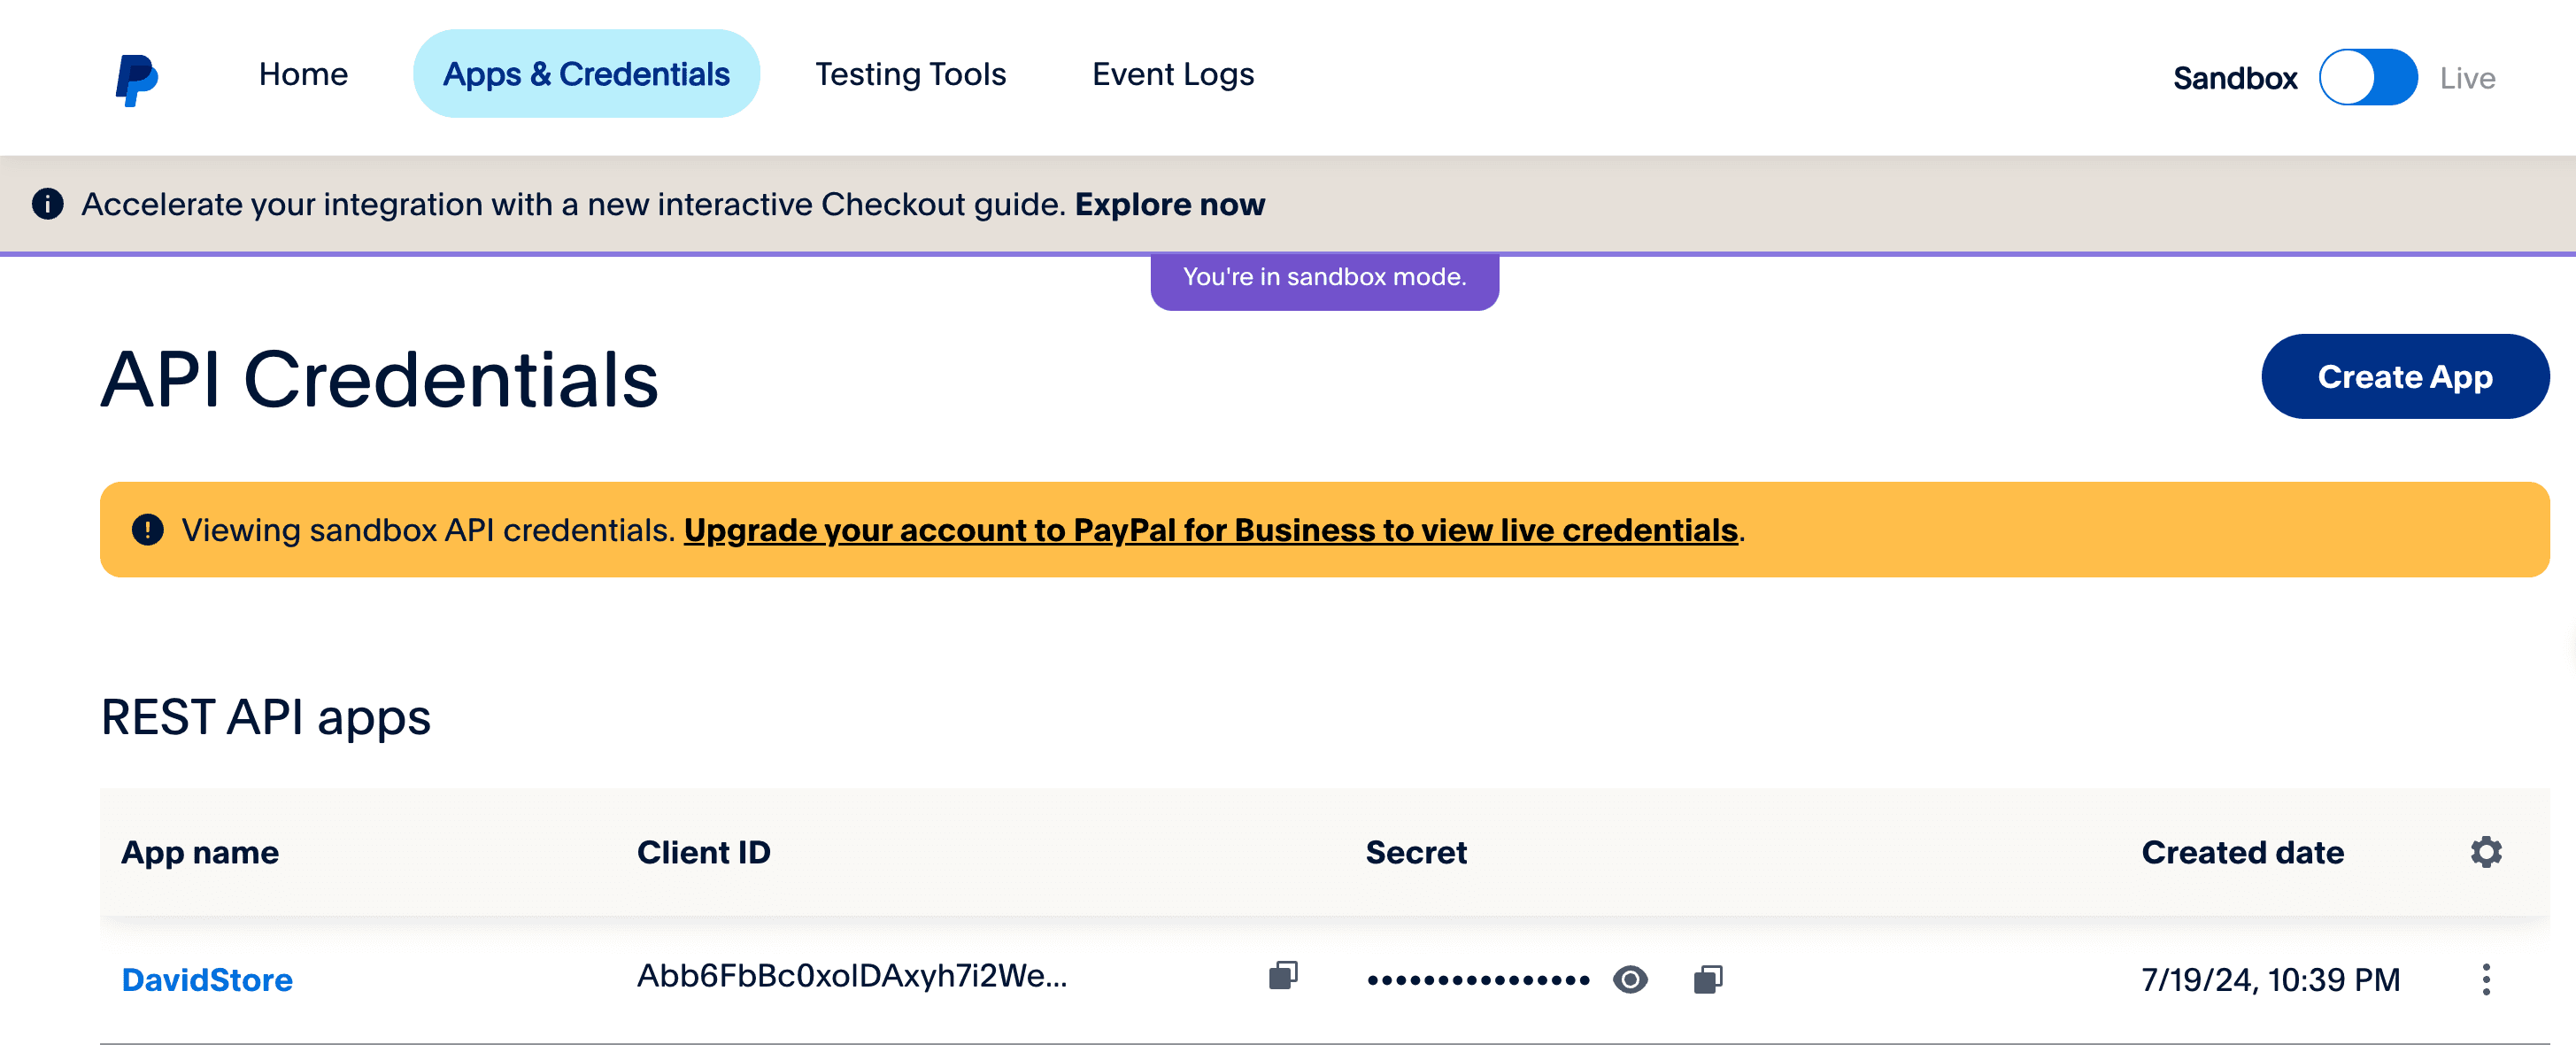
- Step 2: Tạo app
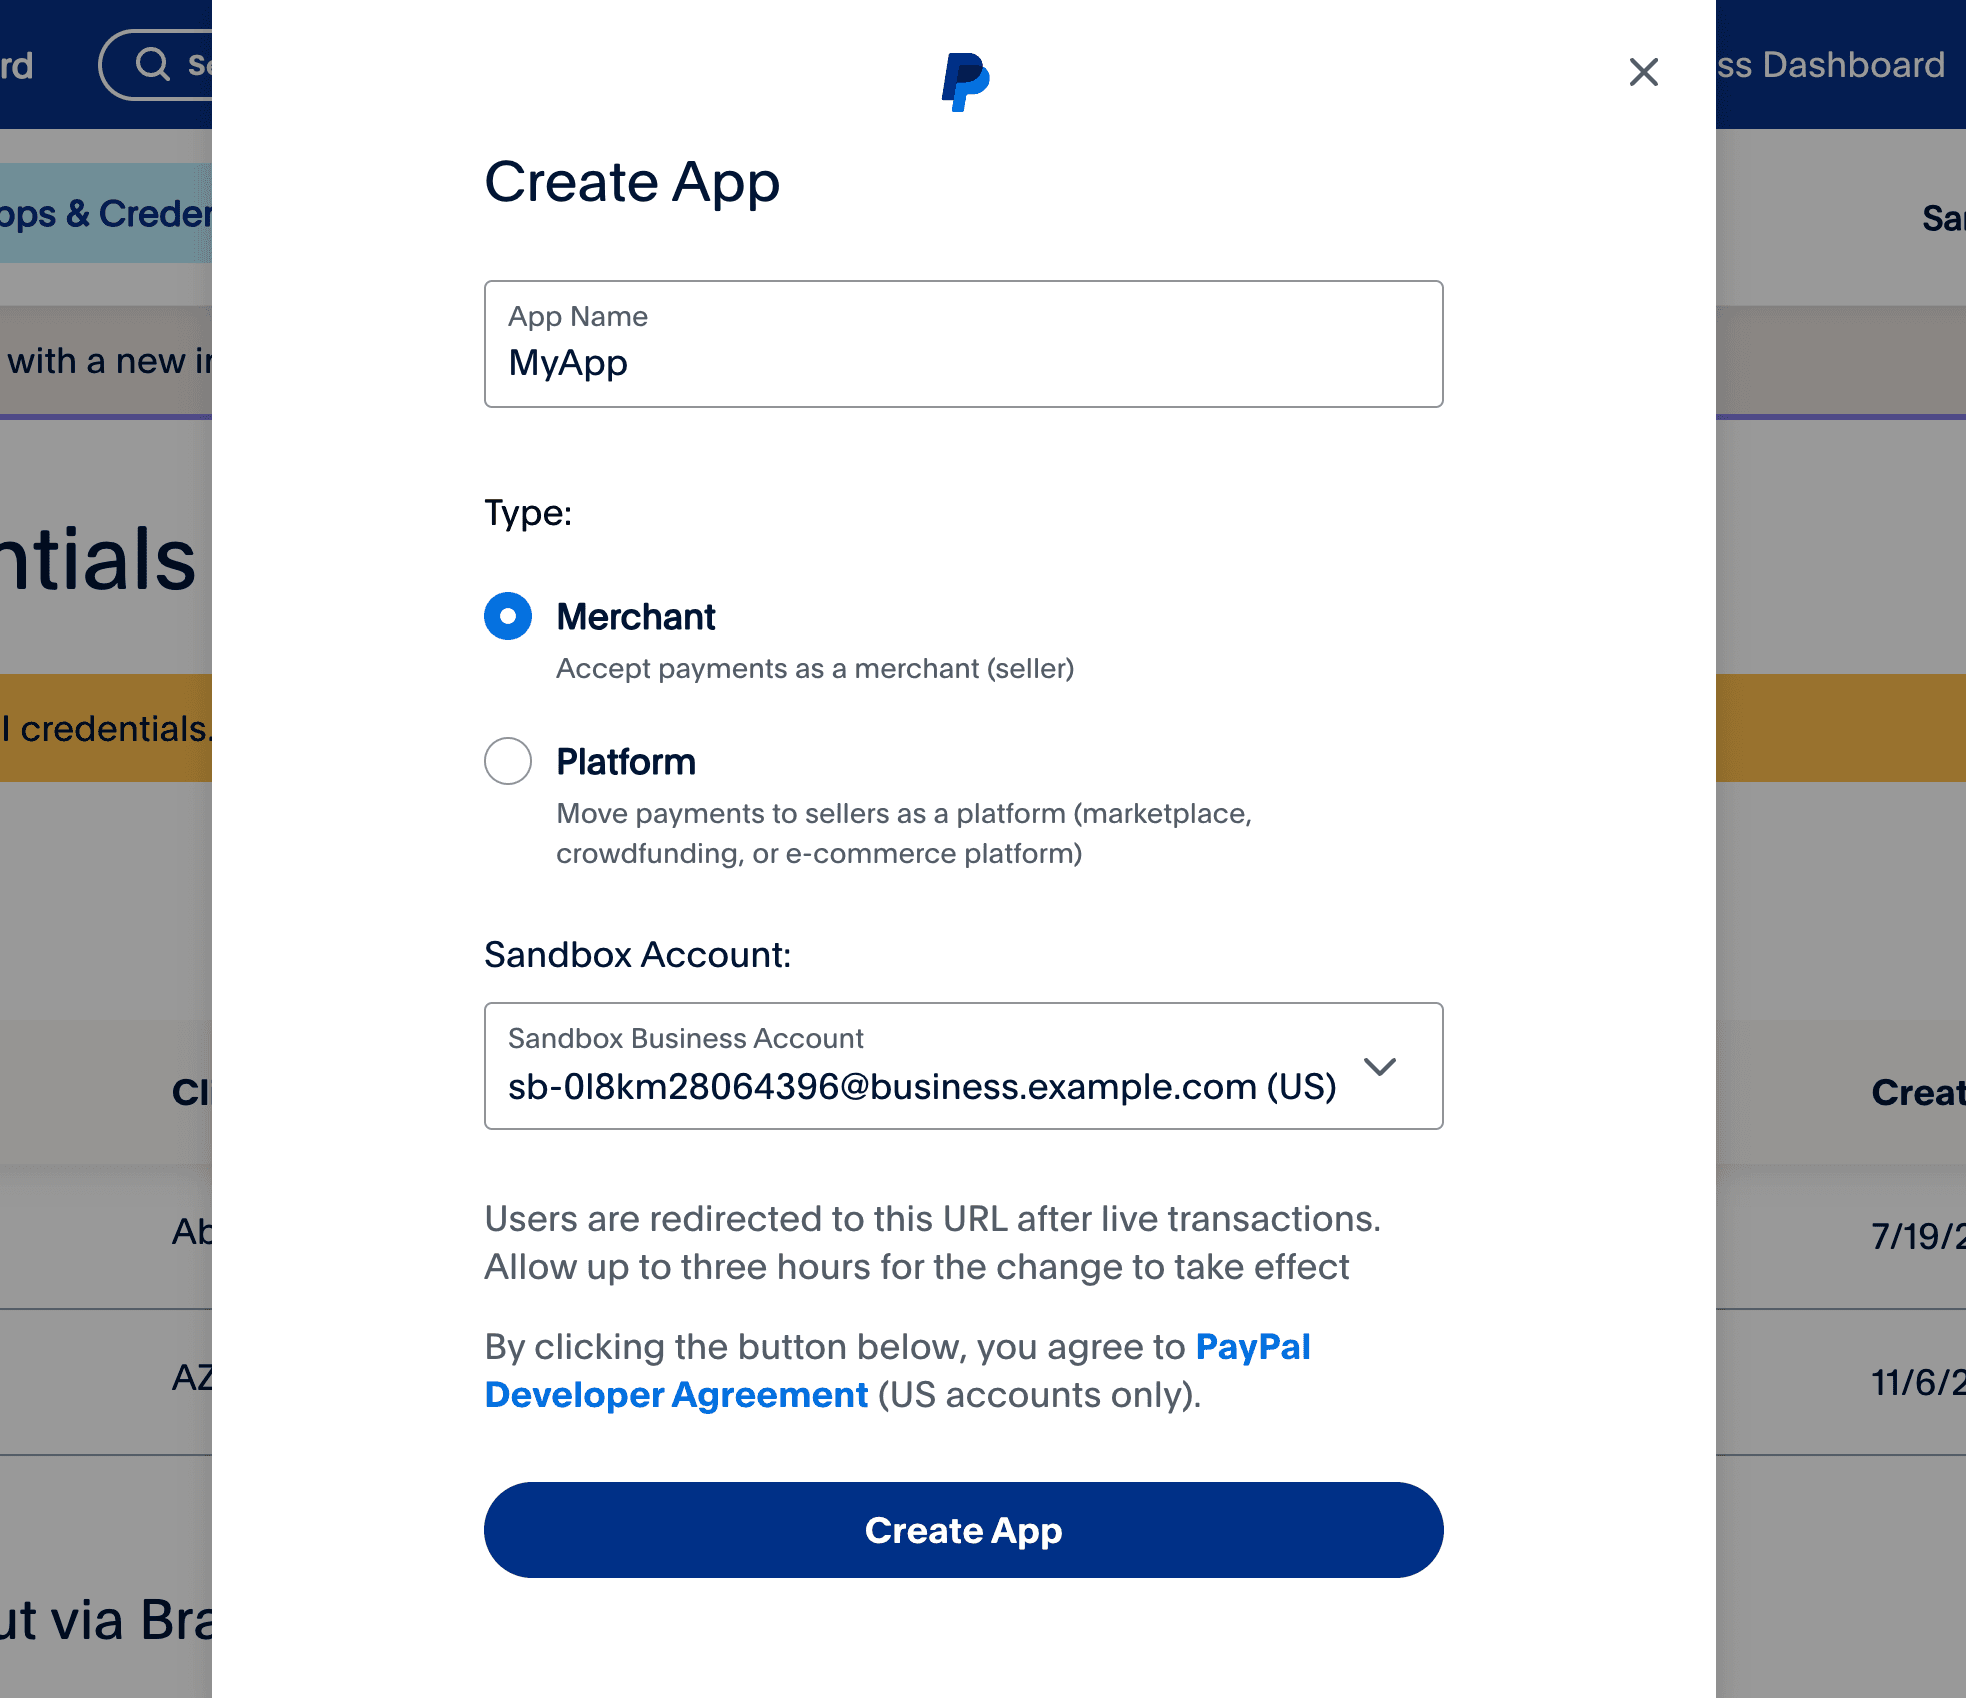
- Step 3: Lưu lại Client ID và Secret key.
2. Tổng quan ứng dụng.
2.1 - Flow
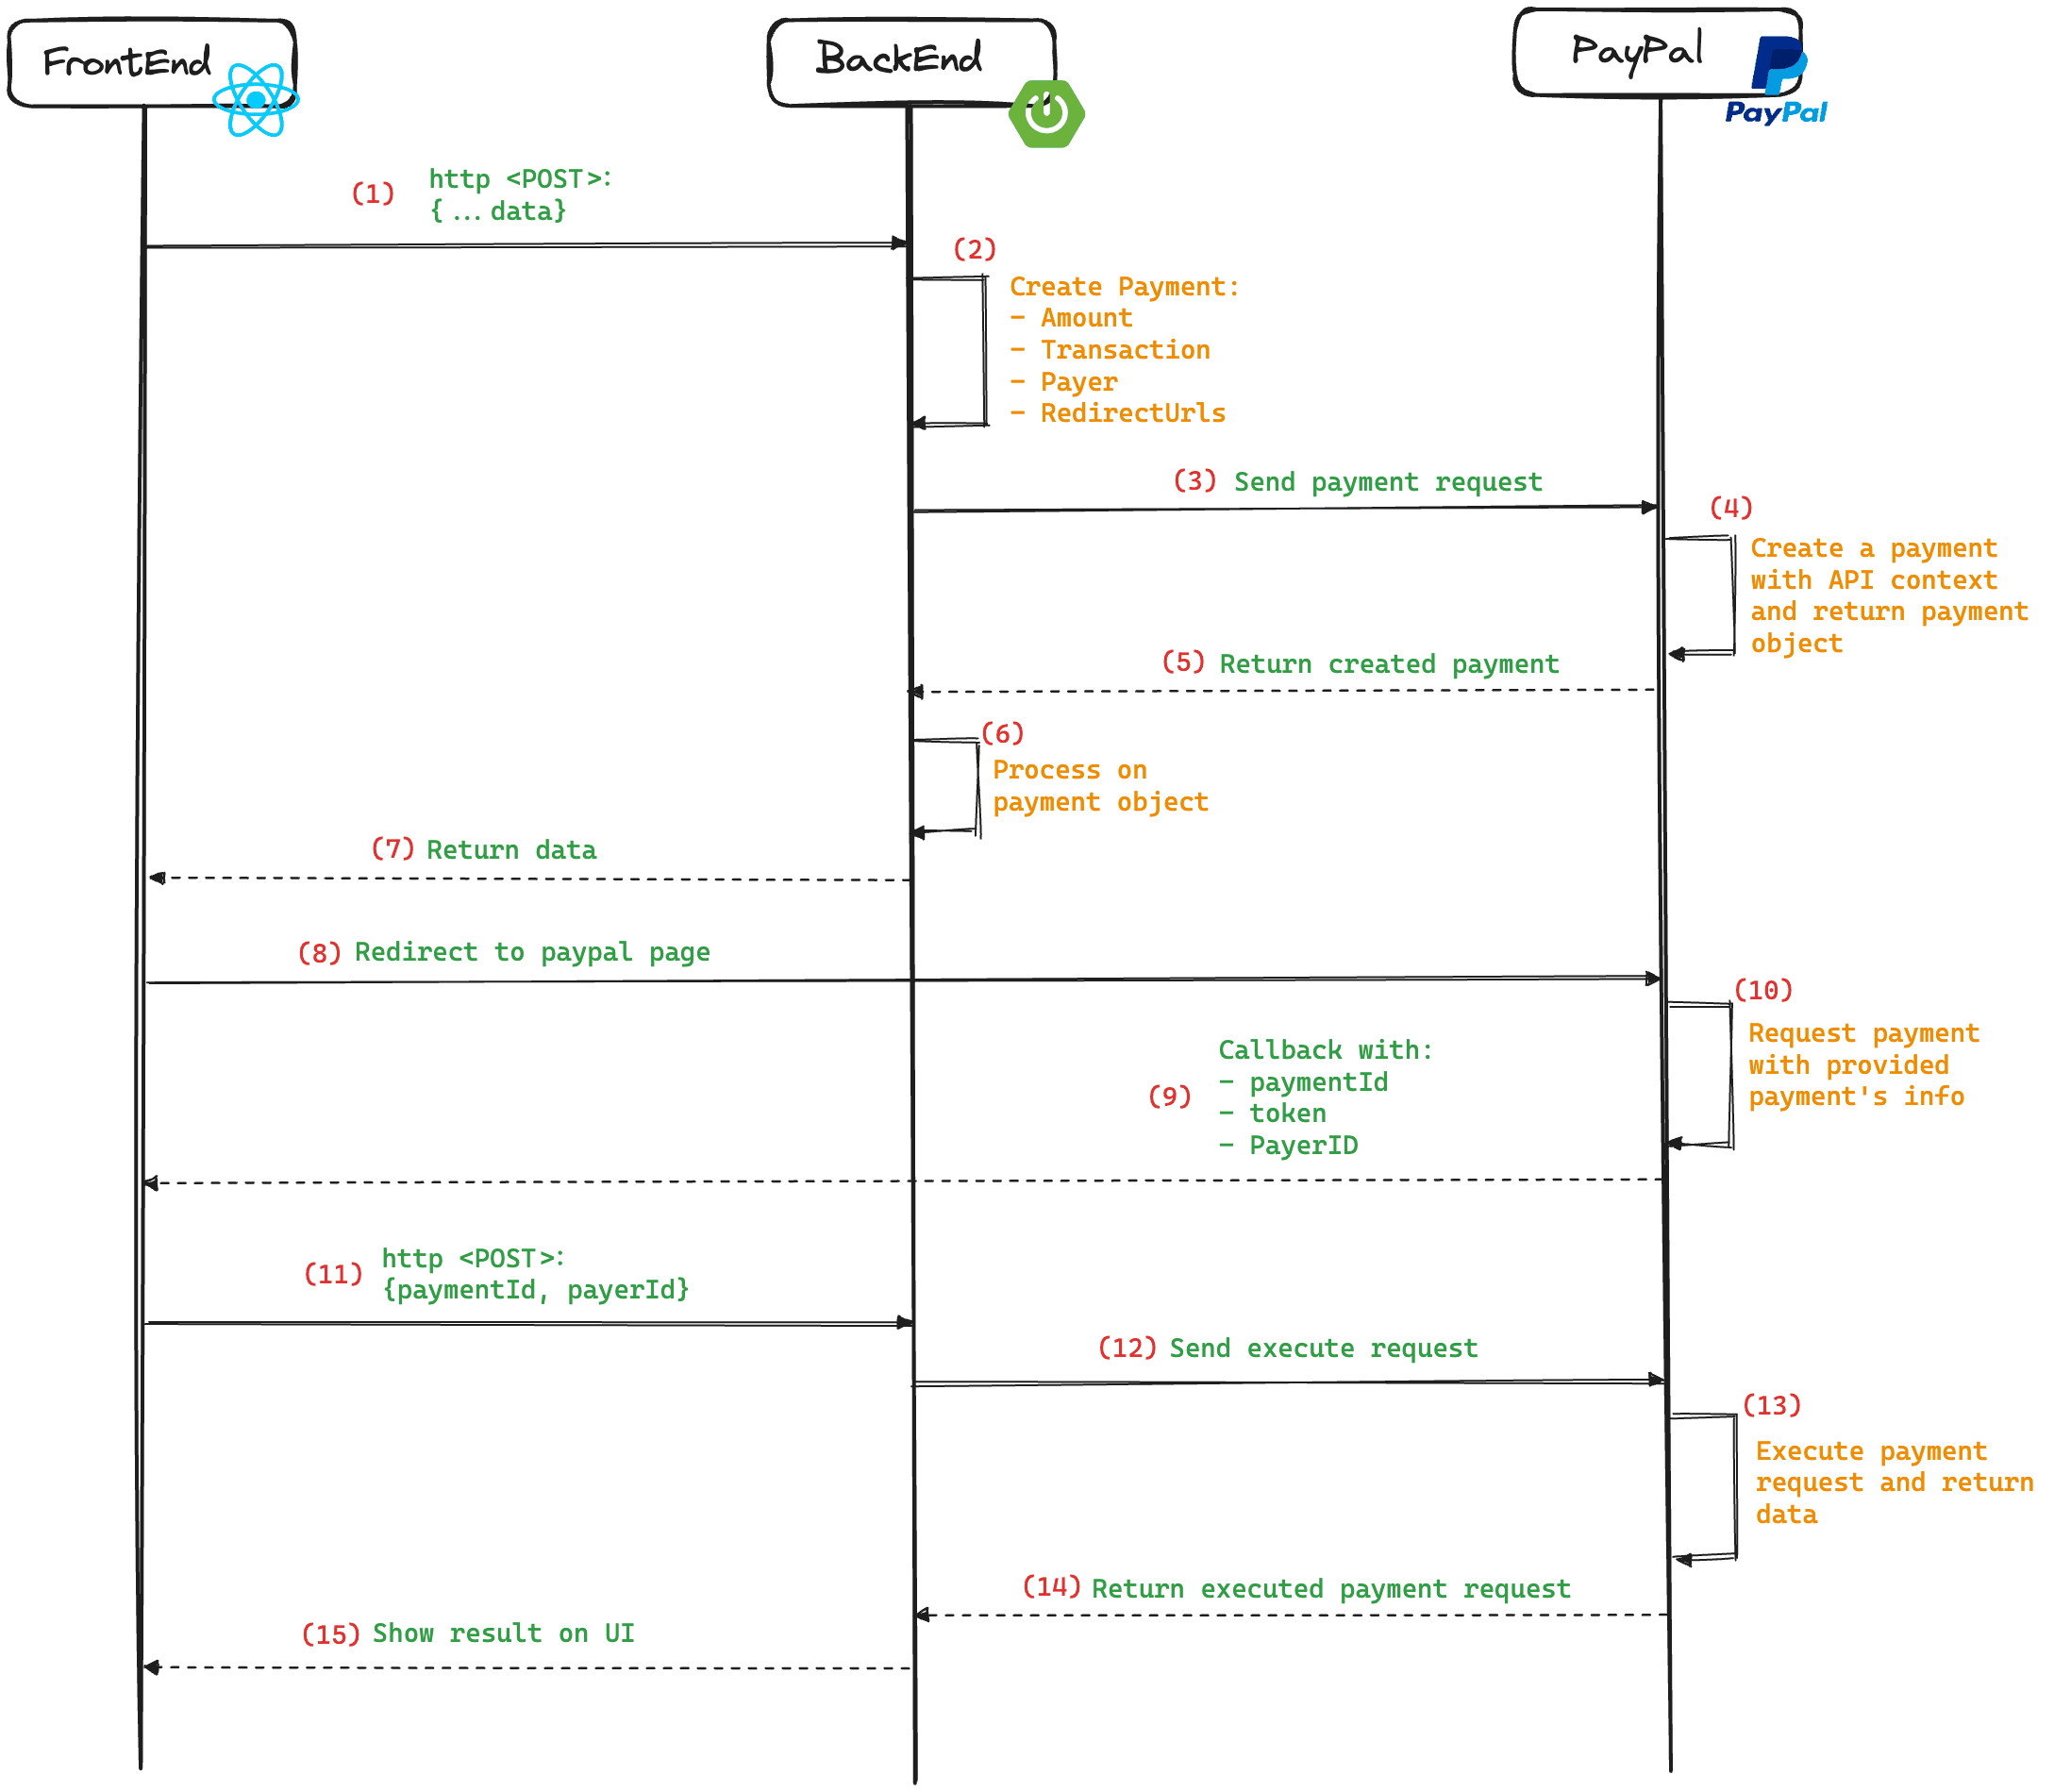
Ứng dụng của chúng ta bao gồm hai module là backend (Spring Boot) và frontend (ReactJS) giao tiếp với nhau thông qua RESTful APIs.
Phía backend chúng ta sẽ implement hai APIs:
{baseUrl}/api/v1/payment/create: Tạo yêu cầu thanh toán{baseUrl}/api/v1/payment/execute: Xử lý yêu cầu thanh toán
Phía frontend bao gồm ba component chính:
<PaymentPage />: Gửi yêu cầu thanh toán tới backend.<SuccessPage />: Gửi yêu cầu xử lý thanh toán tới backend và hiển thị kết quả thanh toán (thành công hoặc thất bại).<CancelPage />: Hiển thị kết quả khi người dùng huỷ thanh toán từ phía PayPal.
Flow của ứng dụng như sau:
2.2 - Demo
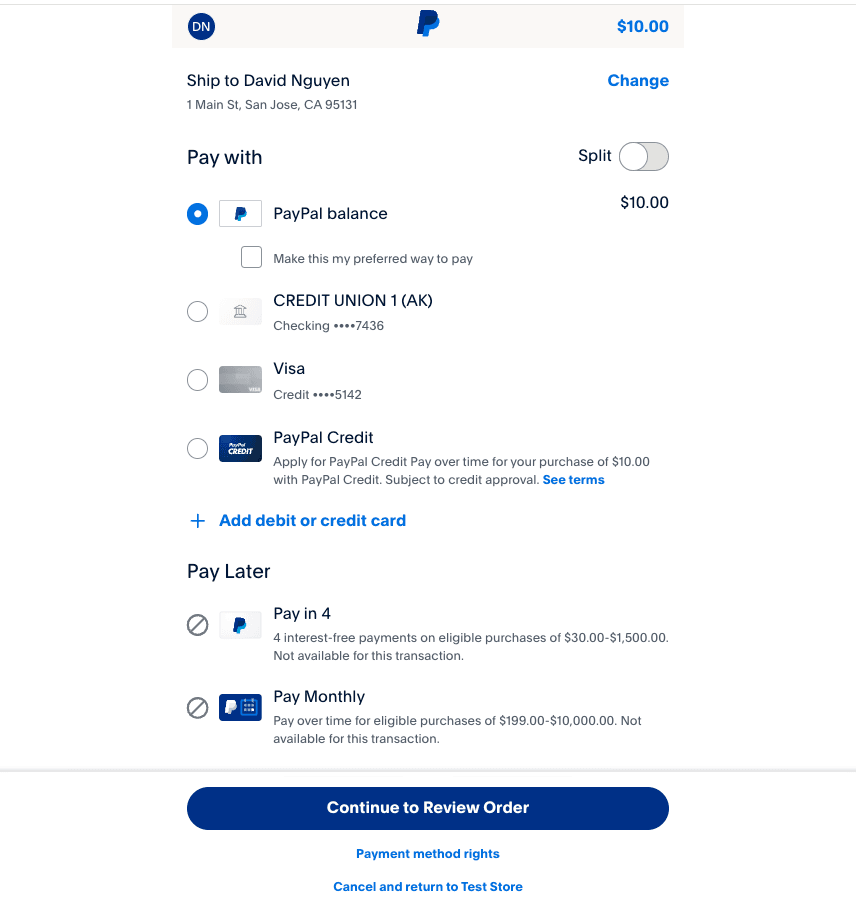
- Step 1: Gửi yêu cầu thanh toán và redirect sang trang của PayPal.
- Step 2: Tạo yêu cầu thanh toán trên trang của PayPal (sandbox).
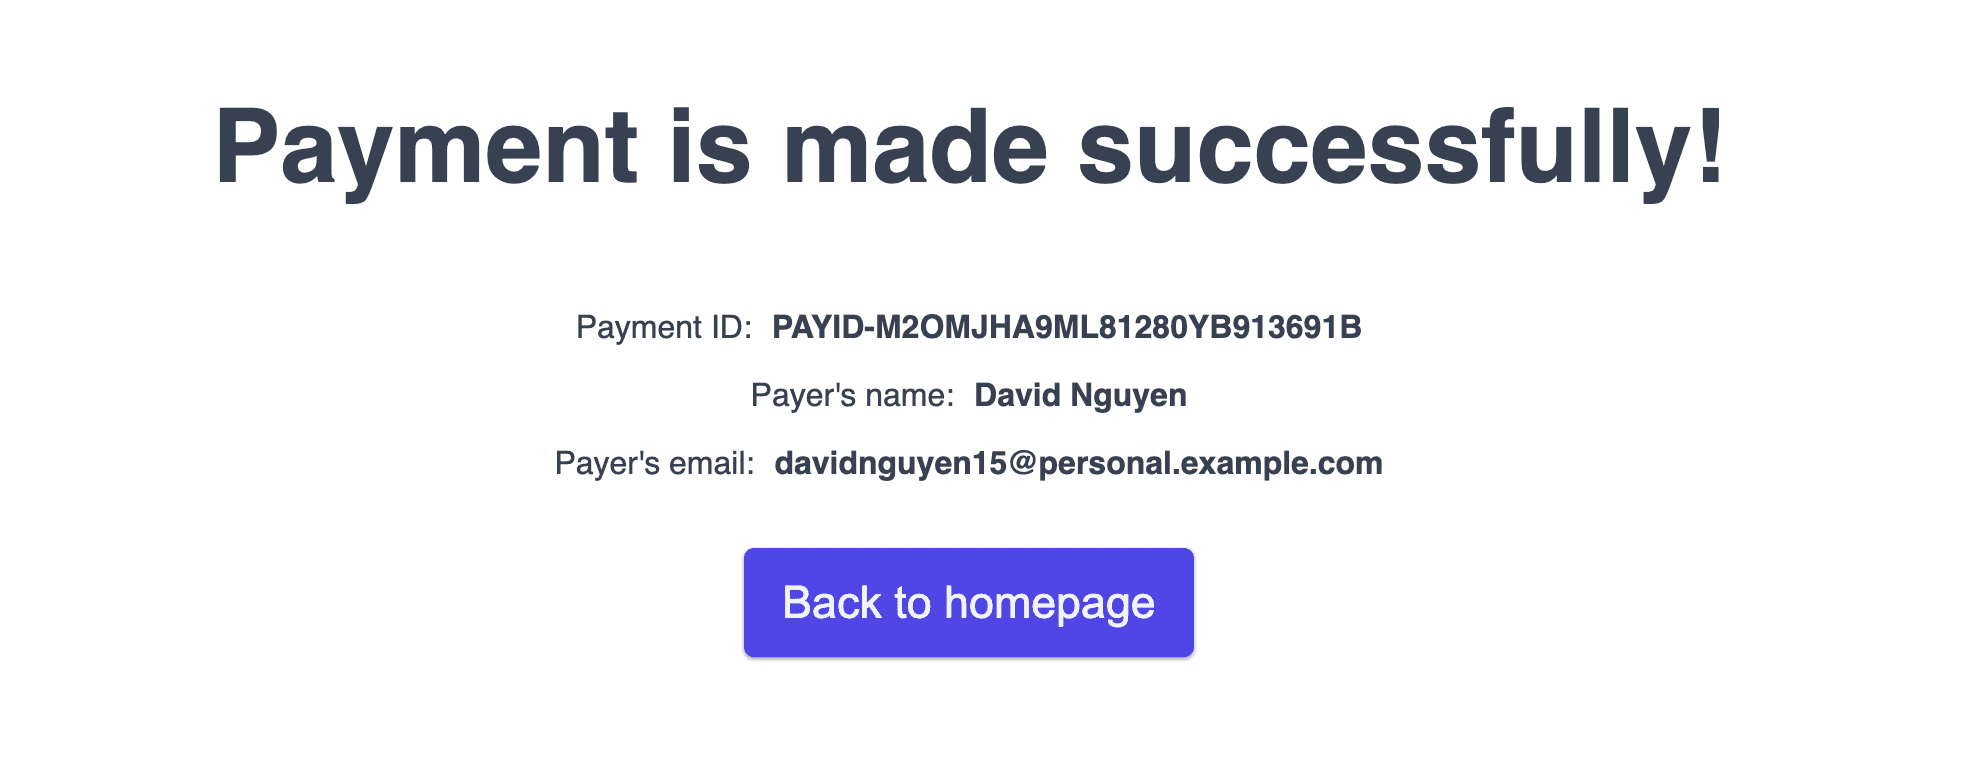
- Step 3.1: Thanh toán thành công.
- Step 3.2: Người dùng huỷ giao dịch

3. Backend (Spring Boot)
3.1. - Setup và cấu hình
Đầu tiên hãy cùng setup một ứng dụng Spring Boot sử dụng https://start.spring.io/
- Project: Maven
- Language: Java (17)
- Spring Boot version: 3.3.2
- Project metadata (group, artifact, name, description, package name): các bạn tự cấu hình phù hợp với dự án.
- Packaging: Jar
- Dependencies:
<dependencies>
	<dependency>
		<groupId>org.springframework.boot</groupId>
		<artifactId>spring-boot-starter-web</artifactId>
	</dependency>
	<dependency>
		<groupId>org.springframework.boot</groupId>
		<artifactId>spring-boot-starter-thymeleaf</artifactId>
	</dependency>
	<dependency>
		<groupId>org.projectlombok</groupId>
		<artifactId>lombok</artifactId>
		<optional>true</optional>
	</dependency>
	<dependency>
		<groupId>org.springframework.boot</groupId>
		<artifactId>spring-boot-starter-test</artifactId>
		<scope>test</scope>
	</dependency>
</dependencies>
Để tích hợp PayPal ở đây mình thêm 2 dependencies đó là paypal-core và rest-api-sdk như sau:
<dependency>
	<groupId>com.paypal.sdk</groupId>
	<artifactId>paypal-core</artifactId>
	<version>1.7.2</version>
</dependency>
<dependency>
	<groupId>com.paypal.sdk</groupId>
	<artifactId>rest-api-sdk</artifactId>
	<version>1.14.0</version>
</dependency>
- Tiếp theo là cấu hình
client-idvàclient-secrettrong fileapplication.ymlnhư sau:
paypal:
  client-id: Abb6FbBc0xolDAxyh7i2WeTHpCcIgTK4hN2NgFyyVxbRbs8FjOO8UM0AE6uBoIhUy3WmPG_mHsAlxf6b
  client-secret: EJqoIjF64JUMRonuSBdc0WSkRjlUoKRa_GZA96YPjdI1phmNTPFGCsdftRdyuEQy0b9DJP8fsWJpvD-W
  mode: sandbox
=> Lưu ý:
client-idvàclient-secretnày các bạn sử dụng thông tin đã lưu ở phần 1.2 chứng không copyclient-idvàclient-secretbên trên của mình (mình đã xoá rồi).- Mặc định Spring Boot sử dụng file cấu hình
application.propertiesnhưng ở đây mình đổi lại thànhapplication.ymldo mình quen sử dụng dạng file này. - Bài viết này mình hướng dẫn các bạn tích hợp PayPal trên môi trường sandbox nên
modeở đây là sandbox, nếu lên môi trường live các bạn phải đổi lại cho phù hơp.
Tiếp theo mình tạo file PaypalConfig để cấu hình APIContext sử dụng cho việc gọi APIs tới các services của PayPal.
@Configuration
public class PaypalConfig {
    @Value("${paypal.client-id}")
    private String clientId;

    @Value("${paypal.client-secret}")
    private String clientSecret;

    @Value("${paypal.mode}")
    private String mode;

    @Bean
    public APIContext apiContext() {
        return new APIContext(clientId, clientSecret, mode);
    }
}
3.2 - Triển khai logic các phương thức create() và execute().
Như mình đã đề cập trong phần 2, chúng ta sẽ có hai phương thức chính là:
create(...params): Tạo yêu cầu thanh toán tới service của PayPal.execute(...params): Tạo yêu cầu thực hiện thanh toán tới service của PayPal.
Phương thức create():
public ResponseEntity<PaymentResponse<?>> create(PaymentCreateReq req, String type)
        throws PayPalRESTException {
    Amount amount = new Amount();
    amount.setCurrency(req.getCurrency());
    amount.setTotal(String.format(Locale.forLanguageTag(req.getCurrency()), "%.2f", req.getTotal()));

    Transaction transaction = new Transaction();
    transaction.setDescription(req.getDescription());
    transaction.setAmount((amount));

    List<Transaction> transactions = new ArrayList<>();
    transactions.add(transaction);

    Payment payment = this.getPayment(req, type, transactions);

    payment = payment.create(apiContext);
    LOGGER.info("State of created payment {} is {}", payment.getId(), payment.getState());

    PaymentCreateRespBody respBody = PaymentCreateRespBody.builder()
            .id(payment.getId())
            .state(payment.getState())
            .links(payment.getLinks())
            .payer(payment.getPayer())
            .build();

    return ResponseEntity.ok(PaymentResponse.builder()
            .code(PaymentRespCode.SUCCESS)
            .data(respBody)
            .build());
}
private Payment getPayment(PaymentCreateReq req, String type, List<Transaction> transactions) {
    Payer payer = new Payer();
    payer.setPaymentMethod(req.getMethod());

    RedirectUrls redirectUrls = new RedirectUrls();
    if (PaymentConst.TYPE_WEB.equals(type)) {
        redirectUrls.setCancelUrl(WEB_CANCEL_URL);
        redirectUrls.setReturnUrl(WEB_SUCCESS_URL);
    } else {
        redirectUrls.setCancelUrl(API_CANCEL_URL);
        redirectUrls.setReturnUrl(API_SUCCESS_URL);
    }

    Payment payment = new Payment();
    payment.setIntent(PaymentConst.INTENT_SALE);
    payment.setPayer(payer);
    payment.setTransactions(transactions);
    payment.setRedirectUrls(redirectUrls);
    return payment;
}
- Ở đây, chúng ta tạo ra một đối tượng
Paymentvới các thông tin:- Amount
- Transaction
- Payer
- RedirectUrls
- Sau đó gọi hàm
payment.create(), phương thức này sẽ gửi một http request tới endpoint https://api.sandbox.paypal.com/v1/payments/payment với data được định nghĩa trong đối tượngPayment.
Phương thức execute():
public ResponseEntity<PaymentResponse<?>> execute(PaymentExecuteReq req) throws PayPalRESTException {
    Payment payment = new Payment();
    payment.setId(req.getPaymentId());

    PaymentExecution paymentExecution = new PaymentExecution();
    paymentExecution.setPayerId(req.getPayerId());

    payment = payment.execute(apiContext, paymentExecution);
    LOGGER.info("State of executed payment {} is {}", payment.getId(), payment.getState());

    PaymentExecuteRespBody respBody = PaymentExecuteRespBody.builder()
            .id(payment.getId())
            .state(payment.getState())
            .fullName(payment.getPayer().getPayerInfo().getFirstName().concat(" ").concat(payment.getPayer().getPayerInfo().getLastName()))
            .email(payment.getPayer().getPayerInfo().getEmail())
            .build();

    return ResponseEntity.ok(PaymentResponse.builder()
            .code(PaymentRespCode.SUCCESS)
            .data(respBody)
            .build());
}
Phương thức này sẽ được gọi sau khi PayPal thực hiện callback trở lại với thông tin payment đã được tạo bao gồm
paymentId,token,PayerID.Từ các thông tin
paymentIdvàPayerIDchúng ta sẽ tạo hai đối tươngPaymentvàPaymentExecutionsau đó gọi hàmpayment.execute()để thực hiện thanh toán.Một http request được gửi tới endpoint https://api.sandbox.paypal.com/v1/payments/payment/0/execute trong đó
{0}làpaymentId.Nếu thanh toán được thực thi thành công, chúng ta sẽ lấy được các thông tin
paymentId,state(trạng thái giao dịch),fullNamevàemailđể hiển thị.
3.3 - Tạo Controller để public các APIs cho frontend.
@RequiredArgsConstructor
@RestController
@CrossOrigin(origins = "http://localhost:5173/")
@RequestMapping("/api/v1")
public class PaypalRestController {
    private final PaypalService paypalService;

    @PostMapping("/payment/create")
    public ResponseEntity<PaymentResponse<?>> createPayment(@RequestBody PaymentCreateReq createReq)
            throws PayPalRESTException {
        return paypalService.create(createReq, PaymentConst.TYPE_API);
    }

    @PostMapping("/payment/execute")
    public ResponseEntity<PaymentResponse<?>> paymentSuccess(@RequestBody PaymentExecuteReq executionReq)
            throws PayPalRESTException {
        return paypalService.execute(executionReq);
    }
}
=> Lưu ý: Ở đây, do mình đang gọi từ frontend (5173) sang backend (8080) nên mình thêm cấu hình @CrossOrigin(origins = "http://localhost:5173/") để tránh bị CORS. Ở trên môi trường live, thực tế để gọi APIs chúng ta sẽ phải thêm các bước authentication và authorization.
4. Frontend (ReactJS)
- Frontend mình sử dụng ReactJs build với Vite (latest). Các bạn có thể setup một ứng dụng ReactJS thông qua command sau:
npm create vite@latest
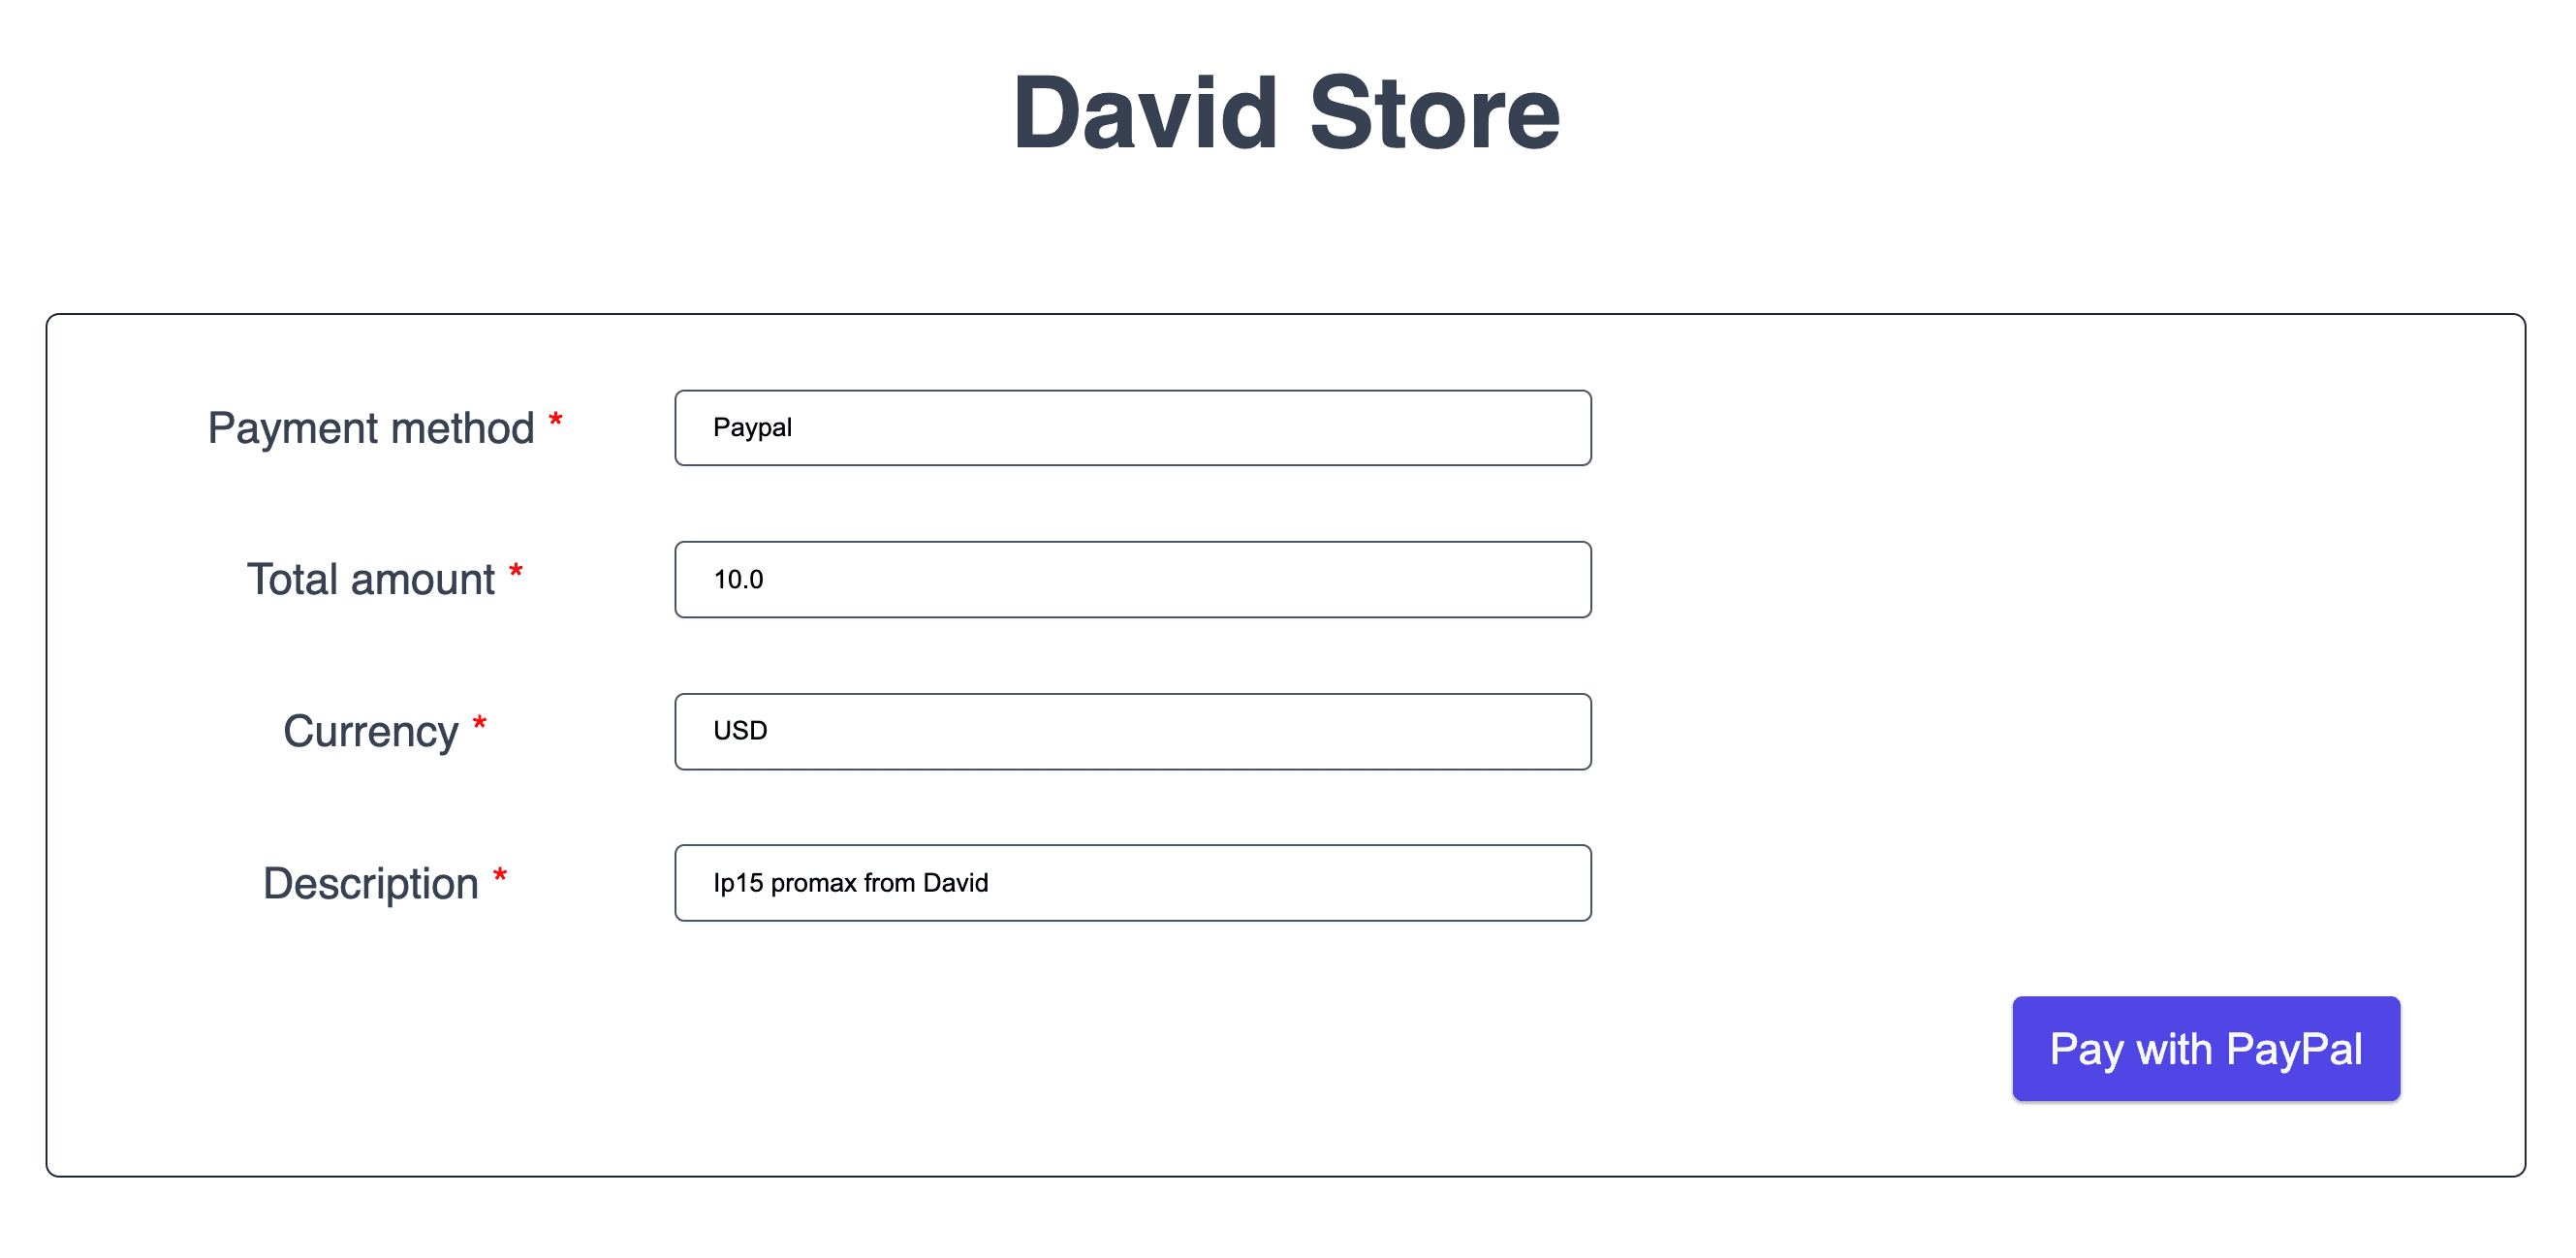
4.1 - PaymentPage.
- Đây coi như là homepage, bao gồm một form cho phép nhập các thông tin payment method, total amout, currency (vì PayPal hỗ trợ thanh toán quốc tế), Description.
=> Lưu ý:
Mình có viết một số components độc lập sử dụng
styled-component, các bạn có thể tham khảo thêm trong source code mình để ở cuối bài viết để hiểu rõ hơn.Các thư viện:
- react-hook-form:
npm i react-hook-form - styped-components:
npm i styled-components - react-router-dom:
npm i react-router-dom - axios:
npm i axios
- react-hook-form:
Sau đây là form cho phép nhập các thông tin thanh toán.
<Form onSubmit={handleSubmit(onSubmit)}>
  <FormRow label={'Payment method'} isRequired={true} error={errors?.method?.message}>
    <Input
      type="text"
      id="method"
      defaultValue={'Paypal'}
      {...register('method', { required: 'Payment method is required' })}
    />
  </FormRow>

  <FormRow label={'Total amount'} isRequired={true} error={errors?.amount?.message}>
    <Input
      type="text"
      id="total"
      defaultValue={'10.0'}
      {...register('total', { required: 'Total amount is required' })}
    />
  </FormRow>

  <FormRow label={'Currency'} isRequired={true} error={errors?.currency?.message}>
    <Input
      type="text"
      id="currency"
      defaultValue={'USD'}
      {...register('currency', { required: 'Currency is required' })}
    />
  </FormRow>

  <FormRow label={'Description'} isRequired={true} error={errors?.description?.message}>
    <Input
      type="text"
      id="description"
      defaultValue={'Ip15 promax from David'}
      {...register('description', { required: 'Description is required' })}
    />
  </FormRow>
  <FormRow>
    <Button disabled={isLoading} onClick={handleClick} type={'submit'}>
      Pay with PayPal
    </Button>
  </FormRow>
</Form>
- Khi form được submit sẽ gọi API tới backend để tạo yêu cầu thanh toán. Từ kết quả trả về (nếu thành công) sẽ lấy được
approval_url(do PayPal trả về) và thực hiện redirect sang trang của PayPal để tiếp tục thanh toán.
const onSubmit = async (data) => {
  try {
    const response = await fetch('http://localhost:8080/api/v1/payment/create', {
      method: 'POST',
      headers: {
        'Content-Type': 'application/json',
      },
      body: JSON.stringify(data),
    })

    if (response.ok) {
      const result = await response.json()
      let linkHref = ''
      result?.data?.links.map((link) => {
        if (link.rel === 'approval_url') linkHref = link.href
        setIsLoading(true)
      })
      window.open(linkHref, '_self', 'noopener,noreferrer')
    } else {
      console.error('Error:', response.statusText)
    }
  } catch (error) {
    console.error('Error:', error)
  }
}
4.2 - SuccessPage.
- Sau khi tạo yêu cầu thanh toán thành công, chúng ta tiếp tục gửi request để thực hiện thanh toán.
useEffect(() => {
  const reqData = {
    paymentId: paymentId,
    payerId: payerId,
  }

  const sendPostRequest = async () => {
    try {
      const res = await axios.post('http://localhost:8080/api/v1/payment/execute', reqData)
      setResponse(res.data)
    } catch (err) {
      setError(err.message)
    } finally {
      setIsLoading(false)
    }
  }
  sendPostRequest()
}, [paymentId, payerId])
- Sau khi thực hiện thanh toán, chúng ta sẽ hiển thị thông tin thanh toán như sau:
<Container>
  {isLoading ? (
    <h1>Payment is executing...</h1>
  ) : response !== null ? (
    <div>
      <h1>Payment is made successfully!</h1>
      <DisplayInfo label={'Payment ID:'} value={response.data.id} />
      <DisplayInfo label={"Payer's name:"} value={response.data.fullName} />
      <DisplayInfo label={"Payer's email:"} value={response.data.email} />
    </div>
  ) : (
    <h1>Payment is fail!</h1>
  )}
  <p>{error ? 'Error: ' + error : ''}</p>
  <Button onClick={redirectToPaymentPage}>Back to homepage</Button>
</Container>
4.2 - CancelPage.
- Cuối cùng để handle việc người dùng huỷ thanh toán (trong khi đang thực hiện) thì chúng ta có CancelPage như sau:
function CancelPage() {
  const navigate = useNavigate()

  const redirectToPaymentPage = () => {
    navigate('/')
  }

  return (
    <>
      <Container>
        <h1>Payment is canceled.</h1>
        <Button onClick={redirectToPaymentPage}>Back to homepage</Button>
      </Container>
    </>
  )
}

export default CancelPage
6. Lời kết
Vừa rồi là những chia sẻ cơ bản của mình trong việc tích hợp thanh toán PayPal trong các ứng dụng Spring Boot. Còn rất nhiều điểm cần cải thiện để ứng dụng có thể chạy thực tế nhưng hi vọng qua bài viết các bạn sẽ hình dung cơ bản được quá trình tích hợp với PayPal sẽ như thế nào.
Toàn bộ source code các bạn có thể tham khảo tại đây.
Hẹn gặp lại các bạn trong các bài viết tiếp theo. Happy Coding!